Flutter 是 Google 开源的便携式 UI 工具包,帮助开发者通过一套代码库高效构建多平台精美应用,支持移动、Web、桌面和嵌入式平台。
使用 Google Maps Flutter 插件,你可以在你的应用中集成 Google 的地图数据。这个插件直接提供了处理同 Google Maps 服务器的连接,并能够进行地图的展示和用户在地图上进行点击、拖拽的交互,它还提供了在地图上进行标记的功能。统统这些能够让你的应用具备定位以及与地图进行交互的体验。
你将构建出什么
在这个 codelab 中,你将会使用 Flutter SDK 来构建出集成 Google Map 的移动应用。这个应用具有以下功能:
|
|
Flutter 是什么?
Flutter 具有以下特点:
- 快速开发:通过 Stateful Hot Reload 技术极速构建你的 Android 和 iOS 应用。
- 快速、灵活分发:面向用户快速迭代,专注于提升原生体验。
- 在 iOS 和 Android 上都具备原生应用的性能:Flutter 的 widget 包含了所有关键性的平台差异 - 例如滚动,导航,图标和字体 - 以提供完整的原生体验。
Google Maps 具有以下特点:
- 覆盖了全球 99% 的地方:为 200 多个国家和地区构建可靠,全面的数据。
- 日更新达 2500 万次:提供准确、实时的位置信息。
- 10 亿的月活用户:以 Google Maps 的基础设施为后盾,可以自信地扩展业务。
这个 codelab 将引导你如何使用 Flutter 构建一个有着 Google Maps 体验的 iOS 和 Android 应用。
你将学到
- 如何创建一个新的 Flutter 应用。
- 如何配置 Google Maps 的 Flutter 插件。
- 如何在地图上增加标记,如何从服务器上获取位置数据。
此 codelab 侧重于将 Google Maps 添加到 Flutter 应用中。屏蔽了一些不相关的概念和代码,你可以直接对代码进行复制和粘贴。
完成本节你需要安装好两样东西:Flutter SDK 和 编辑器,这个 codelab 中使用的编辑器为 Android Studio,但你也可以选择你自己喜欢的编辑器。
你可以在一下任意设备上运行这个 codelab:
- 一个连接到电脑且设置为开发模式的真机(Android 或者 iOS)。
- iOS 模拟器(需要安装 Xcode 开发套件)。
- Android 模拟器(需要配置好 Android Studio)。
开始 Flutter 之旅
开始 Flutter 之旅的最简单方式是使用命令行工具来创建一个具备初始状态的项目。
$ flutter create google_maps_in_flutter
Creating project google_maps_in_flutter...
[Listing of created files elided]
Running "flutter packages get" in google_maps_in_flutter...         6.1s
Wrote 66 files.

All done!
[✓] Flutter (Channel dev, v1.5.0, on Mac OS X 10.14.3 18D109, locale en-AU)
[✓] Android toolchain - develop for Android devices (Android SDK version 28.0.3)
[✓] iOS toolchain - develop for iOS devices (Xcode 10.2)
[✓] Android Studio is fully installed. (version 3.1)
[✓] IntelliJ IDEA Community Edition (version 2018.3.5)
[✓] VS Code (version 1.33.1)
[✓] Connected device is fully installed. (1 available)

In order to run your application, type:

  $ cd google_maps_in_flutter
  $ flutter run

Your application code is in google_maps_in_flutter/lib/main.dart.
添加 Google Maps Flutter 插件作为项目的依赖
在 Flutter 中添加依赖的方法是使用 Pub package 管理工具。在这个 codelab 中你可以直接在 pubspec.yaml 文件里添加一行代码来引入 Google Maps Flutter 插件。
pubspec.yaml
name: google_maps_in_flutter
description: A new Flutter project.
version: 1.0.0+1

environment:
  sdk: ">=2.2.0 <3.0.0"

dependencies:
  flutter:
    sdk: flutter
  # Add the following line
  google_maps_flutter: ^0.5.11

flutter:
  uses-material-design: true
使用一下命令来下载依赖包:
$ flutter packages get
Running "flutter packages get" in google_maps_in_flutter...         0.9s
API key 是最关键的
若要在 Flutter 应用中使用 Google Maps,你需要现在 Google Maps Platform 中配置好 API 项目,你可以根据 Maps SDK for Android's Get API key 和 Maps SDK for iOS' Get API key 这两篇文档来进行配置。有了 API key,再根据以下步骤来进行应用的开发。
在 Android 应用中添加 API Key
若要在 Android 应用中添加一个 API key,编辑 android/app/src/main 目录下的 AndroidManifest.xml 文件。添加如下代码中的 meta-data 数据。
android/app/src/main/AndroidManifest.xml
<manifest xmlns:android="http://schemas.android.com/apk/res/android"
    package="com.example.google_maps_in_flutter">

    <application
        android:name="io.flutter.app.FlutterApplication"
        android:label="google_maps_in_flutter"
        android:icon="@mipmap/ic_launcher">

        <!-- Add the following entry, with your API key -->
        <meta-data android:name="com.google.android.geo.API_KEY"
               android:value="YOUR-KEY-HERE"/>

        <activity
            android:name=".MainActivity"
            android:launchMode="singleTop"
            android:theme="@style/LaunchTheme"
            android:configChanges="orientation|keyboardHidden|keyboard|screenSize|locale|layoutDirection|fontScale|screenLayout|density|uiMode"
            android:hardwareAccelerated="true"
            android:windowSoftInputMode="adjustResize">
            <meta-data
                android:name="io.flutter.app.android.SplashScreenUntilFirstFrame"
                android:value="true" />
            <intent-filter>
                <action android:name="android.intent.action.MAIN"/>
                <category android:name="android.intent.category.LAUNCHER"/>
            </intent-filter>
        </activity>
    </application>
</manifest>
在 iOS 应用中添加 API Key
若要在 iOS 应用中添加 API key,你需要编辑 ios/Runner 目录下的 AppDelegate.m 文件。同 Android 上不同的是,在 iOS 上配置 API key 是需要更改代码的。AppDelegate 是应用进程中的关键单例类。
在文件中更改两处地方。首先,添加 #import 语句来引入 Google Maps 头文件,然后调用 GMSServices 单例中的 provideAPIKey() 方法。这个 API key 使 Google Map 能够正确地提供地图图块。
ios/Runner/AppDelegate.m
#import "AppDelegate.h"
#import "GeneratedPluginRegistrant.h"
// Add the following import.
#import "GoogleMaps/GoogleMaps.h"

@implementation AppDelegate

- (BOOL)application:(UIApplication *)application
    didFinishLaunchingWithOptions:(NSDictionary *)launchOptions {
  [GeneratedPluginRegistrant registerWithRegistry:self];
  // Add the following line, with your API key
  [GMSServices provideAPIKey: @"YOUR-API-KEY"];
  return [super application:application didFinishLaunchingWithOptions:launchOptions];
}

@end
你还需要编辑 ios/Runner/Info.plist 文件。它会强制 iOS 上的 Flutter 进入单线程模式,这是平台视图嵌入所必需设置的。 在 Google Maps 不再运行于开发者预览版模式之前都需要配置这个参数。
ios/Runner/Info.plist
<?xml version="1.0" encoding="UTF-8"?>
<!DOCTYPE plist PUBLIC "-//Apple//DTD PLIST 1.0//EN" "http://www.apple.com/DTDs/PropertyList-1.0.dtd">
<plist version="1.0">
<dict>
        <!-- Add the following entry, from here, -->
        <key>io.flutter.embedded_views_preview</key>
        <true/>
        <!-- to here. -->
        <key>CFBundleDevelopmentRegion</key>
        <string>en</string>
        <key>CFBundleExecutable</key>
        <string>$(EXECUTABLE_NAME)</string>
        <key>CFBundleIdentifier</key>
        <string>$(PRODUCT_BUNDLE_IDENTIFIER)</string>
        <key>CFBundleInfoDictionaryVersion</key>
        <string>6.0</string>
        <key>CFBundleName</key>
        <string>google_maps_in_flutter</string>
        <key>CFBundlePackageType</key>
        <string>APPL</string>
        <key>CFBundleShortVersionString</key>
        <string>$(FLUTTER_BUILD_NAME)</string>
        <key>CFBundleSignature</key>
        <string>????</string>
        <key>CFBundleVersion</key>
        <string>$(FLUTTER_BUILD_NUMBER)</string>
        <key>LSRequiresIPhoneOS</key>
        <true/>
        <key>UILaunchStoryboardName</key>
        <string>LaunchScreen</string>
        <key>UIMainStoryboardFile</key>
        <string>Main</string>
        <key>UISupportedInterfaceOrientations</key>
        <array>
                <string>UIInterfaceOrientationPortrait</string>
                <string>UIInterfaceOrientationLandscapeLeft</string>
                <string>UIInterfaceOrientationLandscapeRight</string>
        </array>
        <key>UISupportedInterfaceOrientations~ipad</key>
        <array>
                <string>UIInterfaceOrientationPortrait</string>
                <string>UIInterfaceOrientationPortraitUpsideDown</string>
                <string>UIInterfaceOrientationLandscapeLeft</string>
                <string>UIInterfaceOrientationLandscapeRight</string>
        </array>
        <key>UIViewControllerBasedStatusBarAppearance</key>
        <false/>
</dict>
</plist>
Putting a map on the screen
在视图上放置地图
好了,现在可以在视图上添加地图了。更新 lib/main.dart 文件如下:
lib/main.dart
import 'package:flutter/material.dart';
import 'package:google_maps_flutter/google_maps_flutter.dart';

void main() => runApp(MyApp());

class MyApp extends StatefulWidget {
  @override
  _MyAppState createState() => _MyAppState();
}

class _MyAppState extends State<MyApp> {
  GoogleMapController mapController;

  final LatLng _center = const LatLng(45.521563, -122.677433);

  void _onMapCreated(GoogleMapController controller) {
    mapController = controller;
  }

  @override
  Widget build(BuildContext context) {
    return MaterialApp(
      home: Scaffold(
        appBar: AppBar(
          title: Text('Maps Sample App'),
          backgroundColor: Colors.green[700],
        ),
        body: GoogleMap(
          onMapCreated: _onMapCreated,
          initialCameraPosition: CameraPosition(
            target: _center,
            zoom: 11.0,
          ),
        ),
      ),
    );
  }
}
运行应用
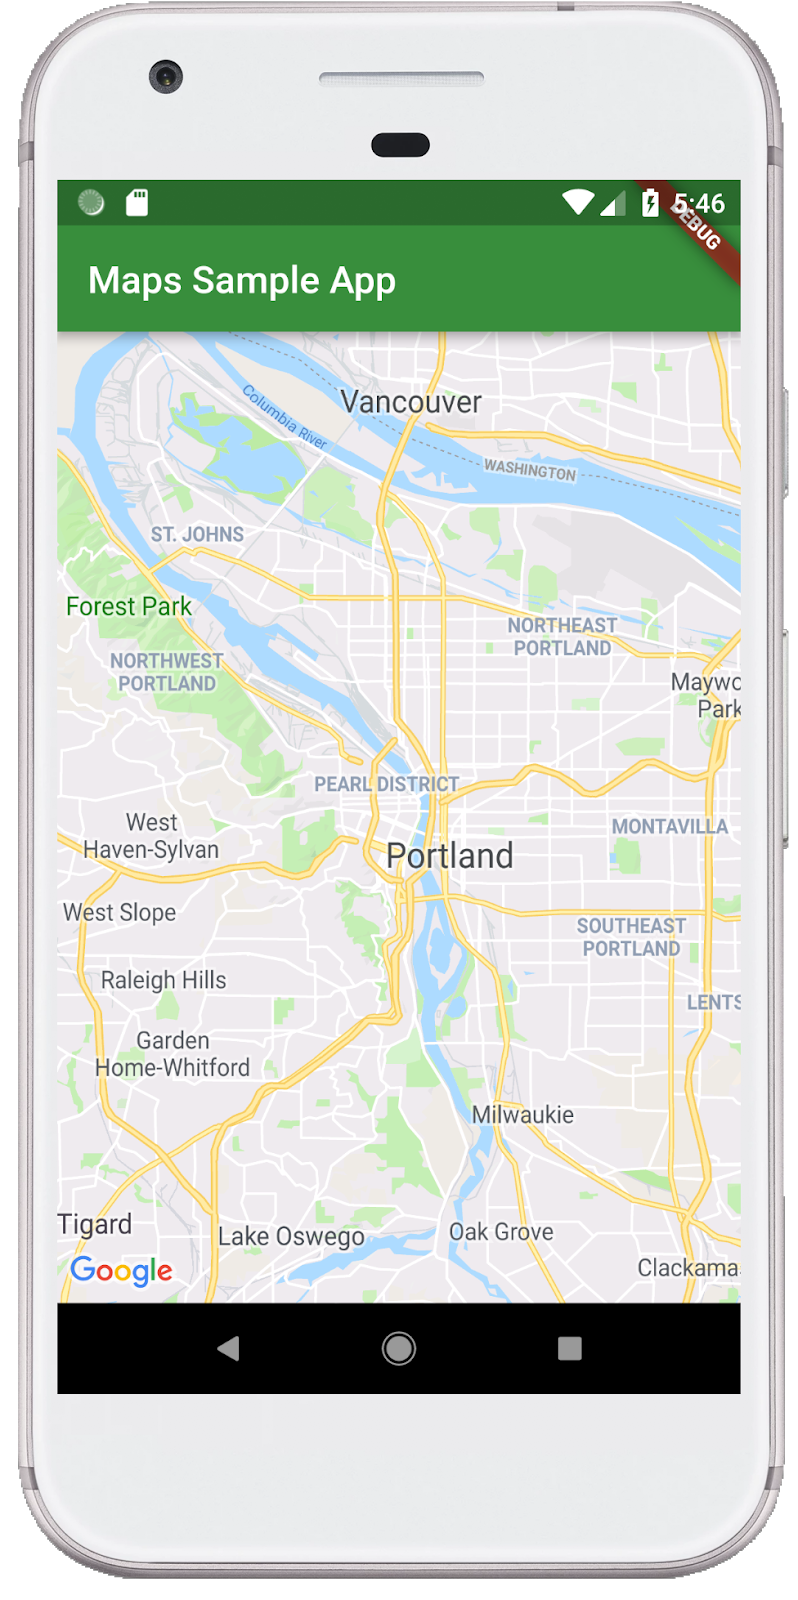
在 iOS 或 Android 中运行 Flutter 应用,可以看到一个以 Portland 为中心的地图界面。 你可以随意修改地图中心来展示你自己的家或者其他一些对你很重要的地方。
$ flutter run
|
|

使用 iOS 最新版本的 Google Maps
在上一步中运行 iOS 应用时,你应该会在控制台上看到有关 Google Maps for iOS 插件版本的警告信息。 这是由于最小版本不匹配:Flutter 支持最低的 iOS 版本是 iOS 8,而最新版本的Google Maps SDK for iOS 支持最低的 iOS 版本为 iOS 9 。默认情况下 CocoaPods 安装的版本是 Google Maps SDK 的最新版本,也就是支持 iOS 8 的版本。在此步骤中,你将更改 iOS Runner 项目以使用最新版本的 Google Maps SDK for iOS。
请注意,此步骤仅适用于 iOS,并需要使用 Xcode 对 iOS target 进行更改。如果你使用的是 Windows 或 Linux,则此步骤不适用于你,直接跳到下一步。
为 CocoaPods 声明要使用的平台
编辑 ios/Podfile 文件来声明最低支持的平台版本。
ios/Podfile
# Uncomment the following line
platform :ios, '9.0'

# CocoaPods analytics sends network stats synchronously affecting flutter build latency.
ENV['COCOAPODS_DISABLE_STATS'] = 'true'

project 'Runner', {
  'Debug' => :debug,
  'Profile' => :release,
  'Release' => :release,
}

# And ignore the rest of this file...
更新 CocoaPod 依赖
运行 CocoaPods 来拉取 iOS 上最新版本的 Google Maps SDK。
$ (cd ios && pod update)
Analyzing dependencies
Fetching podspec for `Flutter` from `.symlinks/flutter/ios`
Fetching podspec for `google_maps_flutter` from `.symlinks/plugins/google_maps_flutter/ios`
Downloading dependencies
Using Flutter (1.0.0)
Installing GoogleMaps 3.0.3
Using google_maps_flutter (0.0.1)
Generating Pods project
Integrating client project
Pod installation complete! There are 2 dependencies from the Podfile and 3 total pods installed.
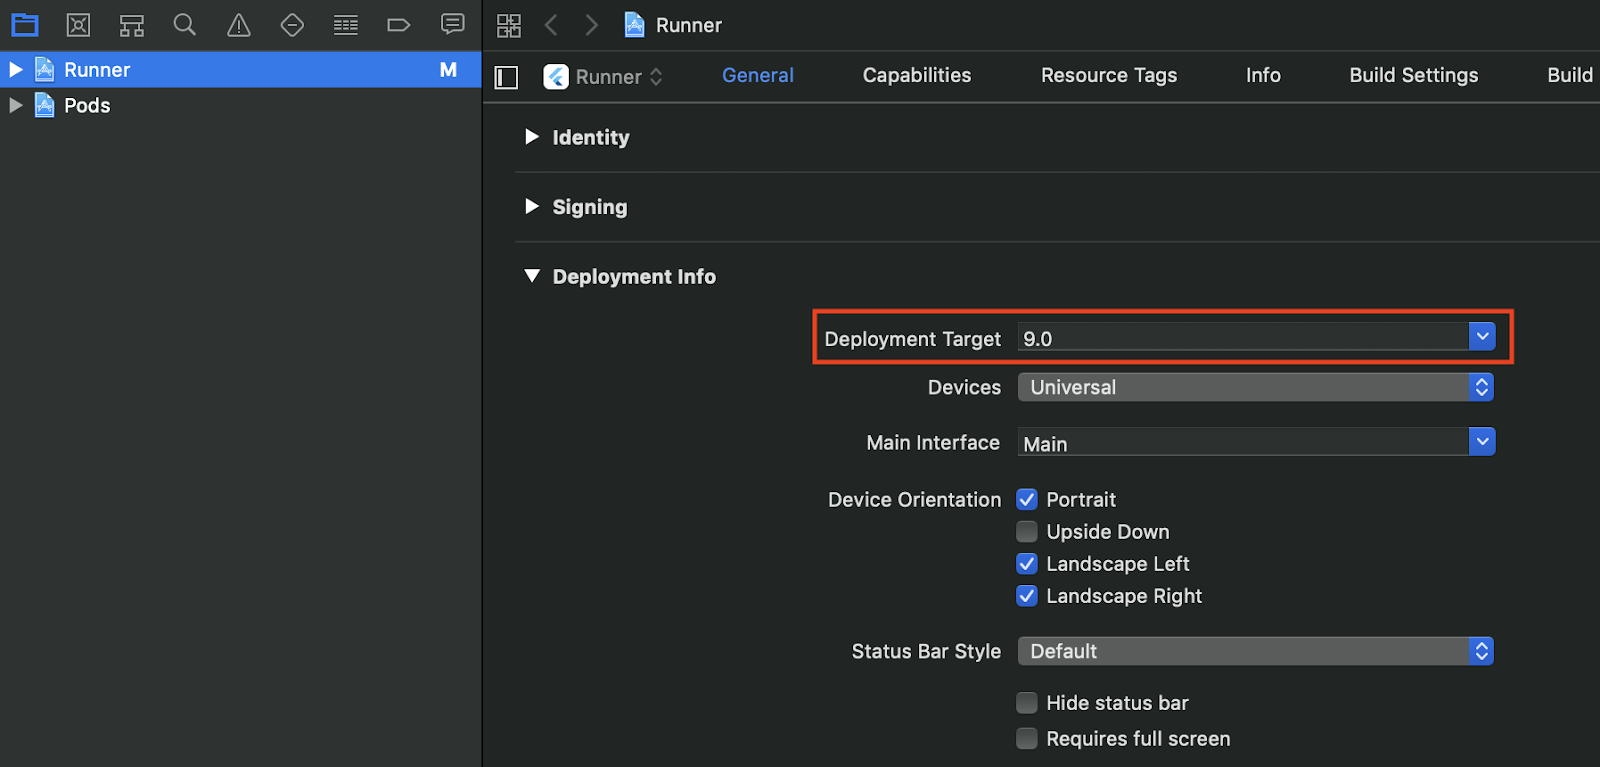
设置 Xcode 的 deployment target
在 iOS Runner Xcode 项目中配置 iOS 的 deployment target 版本,以便 Runner 和 Google Maps 的二进制版本匹配。从命令行打开 Runner 项目,如下所示。
$ open ios/Runner.xcworkspace/
这样会使用 Xcode 打开 iOS Runner 项目,然后在 General 配置面板中配置 Runner 的 Deployment Target 选项。
再次运行应用
以 iOS 模式运行 Flutter 项目,这次会使用 iOS 下最新的 Google Maps SDK。
$ flutter run
Launching lib/main.dart on iPhone XR in debug mode...
Running pod install...                                              1.2s
Running Xcode build...
 ├─Assembling Flutter resources...                           1.3s
 └─Compiling, linking and signing...                         4.5s
Xcode build done.                                            7.6s
Google Maps SDK for iOS version: 3.0.33124.0
Syncing files to device iPhone XR...                             1,267ms

🔥  To hot reload changes while running, press "r". To hot restart (and rebuild state), press "R".
Google 在全球各个地方都有办公地点,从 北美、拉丁美洲、欧洲、亚太地区,到 非洲和中东地区。这些地方的优点是,如果你研究它们,它们有一个很容易使用的 API 地址,用于以 JSON 格式提供各个办公室的位置信息。这步骤,你会将这些办公地点放在地图上显示出来。
随着代码量的增加,现在是时候开始使用 Dart 提供的工具来使代码更具可读性和可维护性。这一步中,你将使用生成的代码来解析 JSON,并使用代码检查工具来对代码中潜在的问题做 分析。
要使用这些功能,在 pubspec.yaml 文件中添加一些新的依赖项。这些依赖项包含了提供 发送 http 请求的能力,对 JSON 文本的解析能力,以及配置在 Google 中广泛使用的 lint 规则,以及将所有这些规则联系在一起的构建器。编辑 pubspec.yaml 文件的依赖项,如下所示:
pubspec.yaml
name: google_maps_in_flutter
description: A new Flutter project.
version: 1.0.0+1

environment:
  sdk: ">=2.2.0 <3.0.0"

dependencies:
  flutter:
    sdk: flutter
  google_maps_flutter: ^0.5.11
  # Add the following two lines
  http: ^0.12.0+1
  json_serializable: ^2.0.2

# Add the following three lines
dev_dependencies:
  pedantic: ^1.4.0
  build_runner: ^1.2.7

flutter:
  uses-material-design: true
在命令行工具中运行 flutter packages get 命令,来获取这些依赖项,然后准备进行下一步。
$ flutter packages get
Running "flutter packages get" in google_maps_in_flutter...         0.5s
$
使用开发者工具
近年来有两个编程语言很好的辅助能力,是代码格式化工具,以及根据一些代码范式做 lint 的工具。 对于代码格式化,你可以使用 flutter format ���令即可,你可以在你所使用的代码编辑器中以某个组合键或文件保存时的方式运行这一命令。
$ flutter format .
Formatting directory .:
Unchanged test/widget_test.dart
Skipping link ios/Pods/Headers/Public/google_maps_flutter/GoogleMapMarkerController.h
Skipping link ios/Pods/Headers/Public/google_maps_flutter/GoogleMapController.h
Skipping link ios/Pods/Headers/Public/google_maps_flutter/GoogleMapsPlugin.h
Skipping link ios/Pods/Headers/Private/google_maps_flutter/GoogleMapMarkerController.h
Skipping link ios/Pods/Headers/Private/google_maps_flutter/GoogleMapController.h
Skipping link ios/Pods/Headers/Private/google_maps_flutter/GoogleMapsPlugin.h
Skipping link ios/.symlinks/plugins/google_maps_flutter
Skipping link ios/.symlinks/flutter
Unchanged lib/main.dart
Unchanged lib/src/locations.g.dart
Unchanged lib/src/locations.dart
Skipping hidden path .dart_tool
$
而对于 lint 来说,Dart 提供了 配置代码 lint 的能力。这一步中,你会添加一些有用的 lint 规则,你可以在 Linter for Dart 这一文档中查看所有的规则。
在项目根目录下添加名为 analysis_options.yaml 的文件,并在文件中添加以下内容:
analysis_options.yaml
include: package:pedantic/analysis_options.yaml

analyzer:
  exclude:
    - lib/src/locations.g.dart

linter:
  rules:
    - always_declare_return_types
    - camel_case_types
    - empty_constructor_bodies
    - annotate_overrides
    - avoid_init_to_null
    - constant_identifier_names
    - one_member_abstracts
    - slash_for_doc_comments
    - sort_constructors_first
    - unnecessary_brace_in_string_interps
第一行包括在 Google 内部广泛使用的一组默认规则,而 linter 规则部分则介绍了可能需要用到的规则。其中,exclude ���行引用尚未生成的文件。要运行 lint 规则,按如下方式即可:
$ flutter analyze
Analyzing google_maps_in_flutter...
No issues found! (ran in 1.8s)
$
如果你发现分析器有警告,不要担心,我们会在接下来修复这些问题。
使用生成代码来解析 JSON 数据
你可能已经注意到了从 API 返回的 JSON 数据是由一定规则的。根据这些规则来生成代码,来将数据序列化到可以在代码中使用的对象中会很大大提高开发效率。虽然 Dart 提供了各种用于反序列化 JSON 数据的工具(从完全自己构建,到使用 built_value ���对数据进行签名和使用),但此步骤使用了 JSON annotations。
在 lib/src 文件夹下,创建 locations.dart 文件,在文件中添加以下代码来描述所返回的 JSON 数据。
lib/src/locations.dart
import 'dart:convert';
import 'dart:io';
import 'package:http/http.dart' as http;
import 'package:json_annotation/json_annotation.dart';

part 'locations.g.dart';

@JsonSerializable()
class LatLng {
  LatLng({
    this.lat,
    this.lng,
  });

  factory LatLng.fromJson(Map<String, dynamic> json) => _$LatLngFromJson(json);
  Map<String, dynamic> toJson() => _$LatLngToJson(this);

  final double lat;
  final double lng;
}

@JsonSerializable()
class Region {
  Region({
    this.coords,
    this.id,
    this.name,
    this.zoom,
  });

  factory Region.fromJson(Map<String, dynamic> json) => _$RegionFromJson(json);
  Map<String, dynamic> toJson() => _$RegionToJson(this);

  final LatLng coords;
  final String id;
  final String name;
  final double zoom;
}

@JsonSerializable()
class Office {
  Office({
    this.address,
    this.id,
    this.image,
    this.lat,
    this.lng,
    this.name,
    this.phone,
    this.region,
  });

  factory Office.fromJson(Map<String, dynamic> json) => _$OfficeFromJson(json);
  Map<String, dynamic> toJson() => _$OfficeToJson(this);

  final String address;
  final String id;
  final String image;
  final double lat;
  final double lng;
  final String name;
  final String phone;
  final String region;
}

@JsonSerializable()
class Locations {
  Locations({
    this.offices,
    this.regions,
  });

  factory Locations.fromJson(Map<String, dynamic> json) =>
      _$LocationsFromJson(json);
  Map<String, dynamic> toJson() => _$LocationsToJson(this);

  final List<Office> offices;
  final List<Region> regions;
}

Future<Locations> getGoogleOffices() async {
  const googleLocationsURL = 'https://about.google/static/data/locations.json';

  // Retrieve the locations of Google offices
  final response = await http.get(googleLocationsURL);
  if (response.statusCode == 200) {
    return Locations.fromJson(json.decode(response.body));
  } else {
    throw HttpException(
        'Unexpected status code ${response.statusCode}:'
        ' ${response.reasonPhrase}',
        uri: Uri.parse(googleLocationsURL));
  }
}
一旦你添加了这个代码,你的 IDE(如果你用了的话)应该会显示一些红色的波浪线,因为它引用了一个不存在的文件 locations.g.dart。这个生成的文件会在非类型化 JSON 结构和命名对象之间进行转换。通过 build_runner 来创建它:
$ flutter packages pub run build_runner build
[INFO] Generating build script...
[INFO] Generating build script completed, took 291ms

[INFO] Initializing inputs
[INFO] Reading cached asset graph...
[INFO] Reading cached asset graph completed, took 65ms

[INFO] Checking for updates since last build...
[INFO] Checking for updates since last build completed, took 595ms

[INFO] Running build...
[INFO] 1.2s elapsed, 0/1 actions completed.
[INFO] Running build completed, took 1.2s

[INFO] Caching finalized dependency graph...
[INFO] Caching finalized dependency graph completed, took 27ms

[INFO] Succeeded after 1.2s with 1 outputs (1 actions)

$
这样应该不会看到报错了。
更改 main.dart 文件来请求地图数据,然后使用返回的信息来在地图上添加办公室标记。
lib/main.dart
import 'package:flutter/material.dart';
import 'package:google_maps_flutter/google_maps_flutter.dart';
import 'src/locations.dart' as locations;

void main() => runApp(MyApp());

class MyApp extends StatefulWidget {
  @override
  _MyAppState createState() => _MyAppState();
}

class _MyAppState extends State<MyApp> {
  final Map<String, Marker> _markers = {};
  Future<void> _onMapCreated(GoogleMapController controller) async {
    final googleOffices = await locations.getGoogleOffices();
    setState(() {
      _markers.clear();
      for (final office in googleOffices.offices) {
        final marker = Marker(
          markerId: MarkerId(office.name),
          position: LatLng(office.lat, office.lng),
          infoWindow: InfoWindow(
            title: office.name,
            snippet: office.address,
          ),
        );
        _markers[office.name] = marker;
      }
    });
  }

  @override
  Widget build(BuildContext context) => MaterialApp(
        home: Scaffold(
          appBar: AppBar(
            title: const Text('Google Office Locations'),
            backgroundColor: Colors.green[700],
          ),
          body: GoogleMap(
            onMapCreated: _onMapCreated,
            initialCameraPosition: CameraPosition(
              target: const LatLng(0, 0),
              zoom: 2,
            ),
            markers: _markers.values.toSet(),
          ),
        ),
      );
}
这个代码执行了几个操作:
- 在
_onMapCreated中,它await到加载的时候开始解析 JSON 数据。然后使用返回的数据在setState()回调中创建 Marker,一旦应用接收到创建的 marker 之后,setState 会让 Flutter 将它绘制到屏幕上,这样就会显示办公室信息了。 - 这些地图的标记存储在与
GoogleMapwidget 关联的Map中。这会将标记链接到正确的地图上。当然,你可以使用多个地图并在每个地图中显示不同的标记。
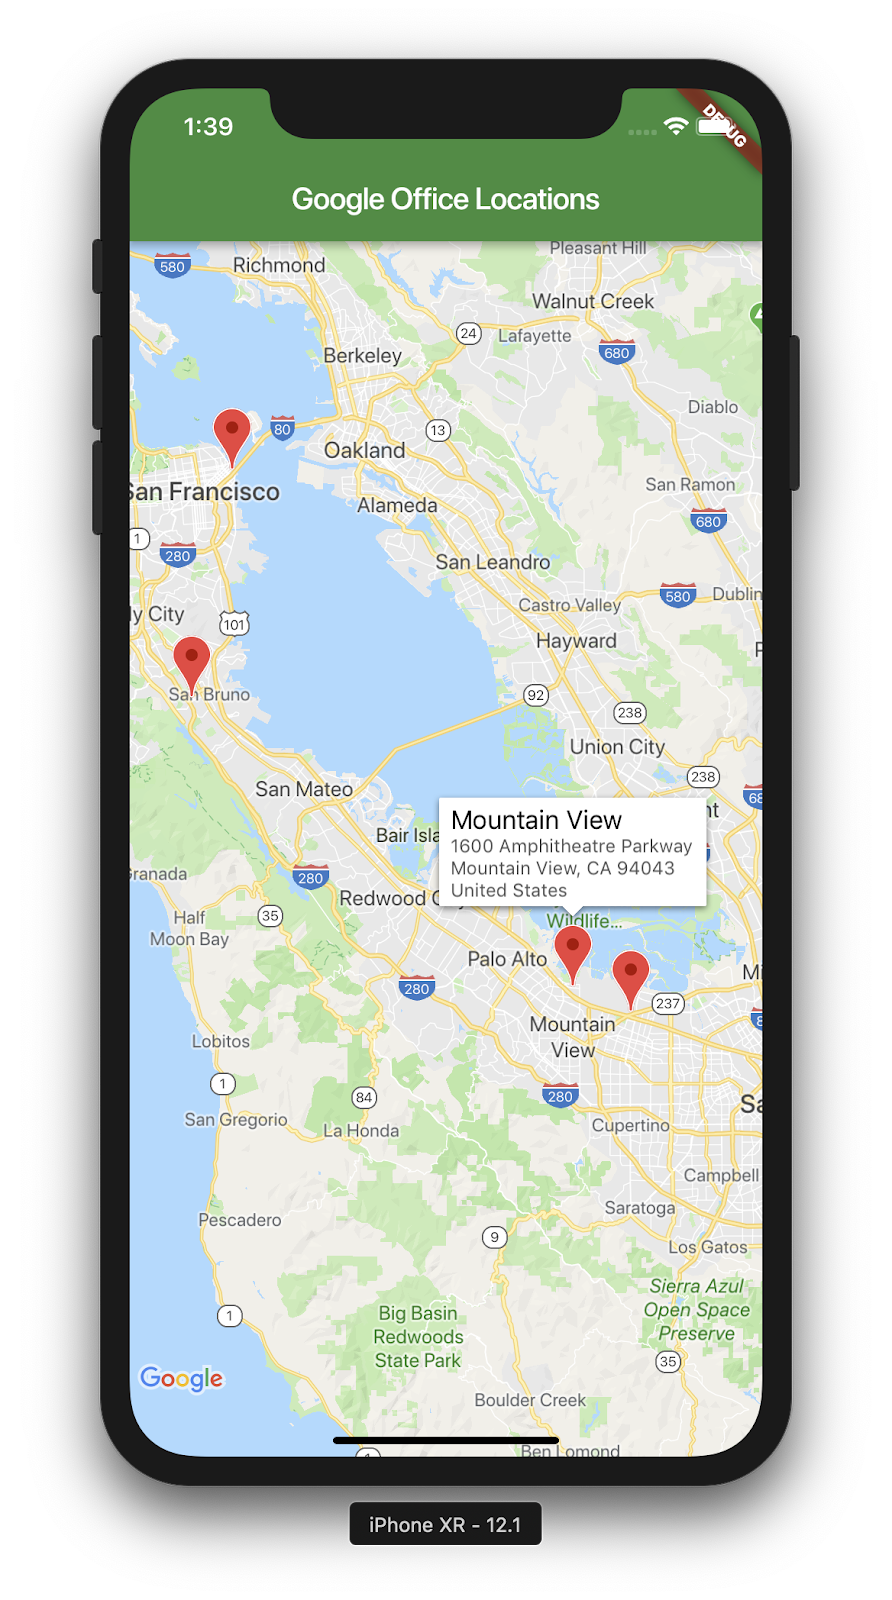
好了,这就是当前完成的应用截图了。此时你还可以对它进行许多有趣的补充。例如,你可以添加办公室的列表视图,当用户点击办公室时移动和缩放地图,当然,这些就当作是练习留给读者了。
恭喜你!
你已经完成了这个 codelab,并构建了一个 Google Map 的 Flutter 应用。另外,你还于服务器进行了交互并解析了 JSON 数据。
其他的一些步骤
此 codelab 做到了在地图上显示多个标记。有许多移动应用以此功能为基础,可满足许多不同的用户需求。还有其他资源可以帮助你更进一步:
- 使用 Flutter 和 Google Maps 构建移动应用(Cloud Next '19 的一个演讲)
- Hadrien Lejard 的
google_maps_webservicepackage,通过它可以让 Google Maps Web Service 像 Directions API, Distance Matrix API 和 Places API 一样好用。 - 如果你想了解通过 JSON REST 使用 API,可以参阅 Andrew Brogdon 在 Medium 上的一篇文章,它介绍了一系列如何使用 JSON REST API。
特别感谢
- 感谢来自 Flutter 社区的 iCell 翻译,
- 感谢 Zhuoqun Jin 帮助校对和修改格式。