Flutter is Google's UI toolkit for building beautiful, natively compiled applications for mobile, web, and desktop from a single codebase. In this codelab, you'll build a Flutter desktop app that accesses GitHub APIs to retrieve your repositories, assigned issues, and pull requests. In accomplishing this task, you'll create and use plugins to interact with native APIs and desktop applications, and use code generation to build type safe client libraries for GitHub's APIs.
What you'll learn
- How to create a Flutter desktop application
- How to authenticate using OAuth2 on desktop
- How to use GraphQL from Flutter with code generation
- How to create a Flutter plugin to integrate with native APIs
What you'll build
In this codelab, you'll build a desktop application featuring a GitHub GraphQL API integration using the Flutter SDK. Your app will perform the following:
- Authenticate to GitHub
- Retrieve data from GitHub v4 API
- Create a Flutter plugin for macOS and/or Linux
- Develop a Flutter UI hot reloading into a native desktop application
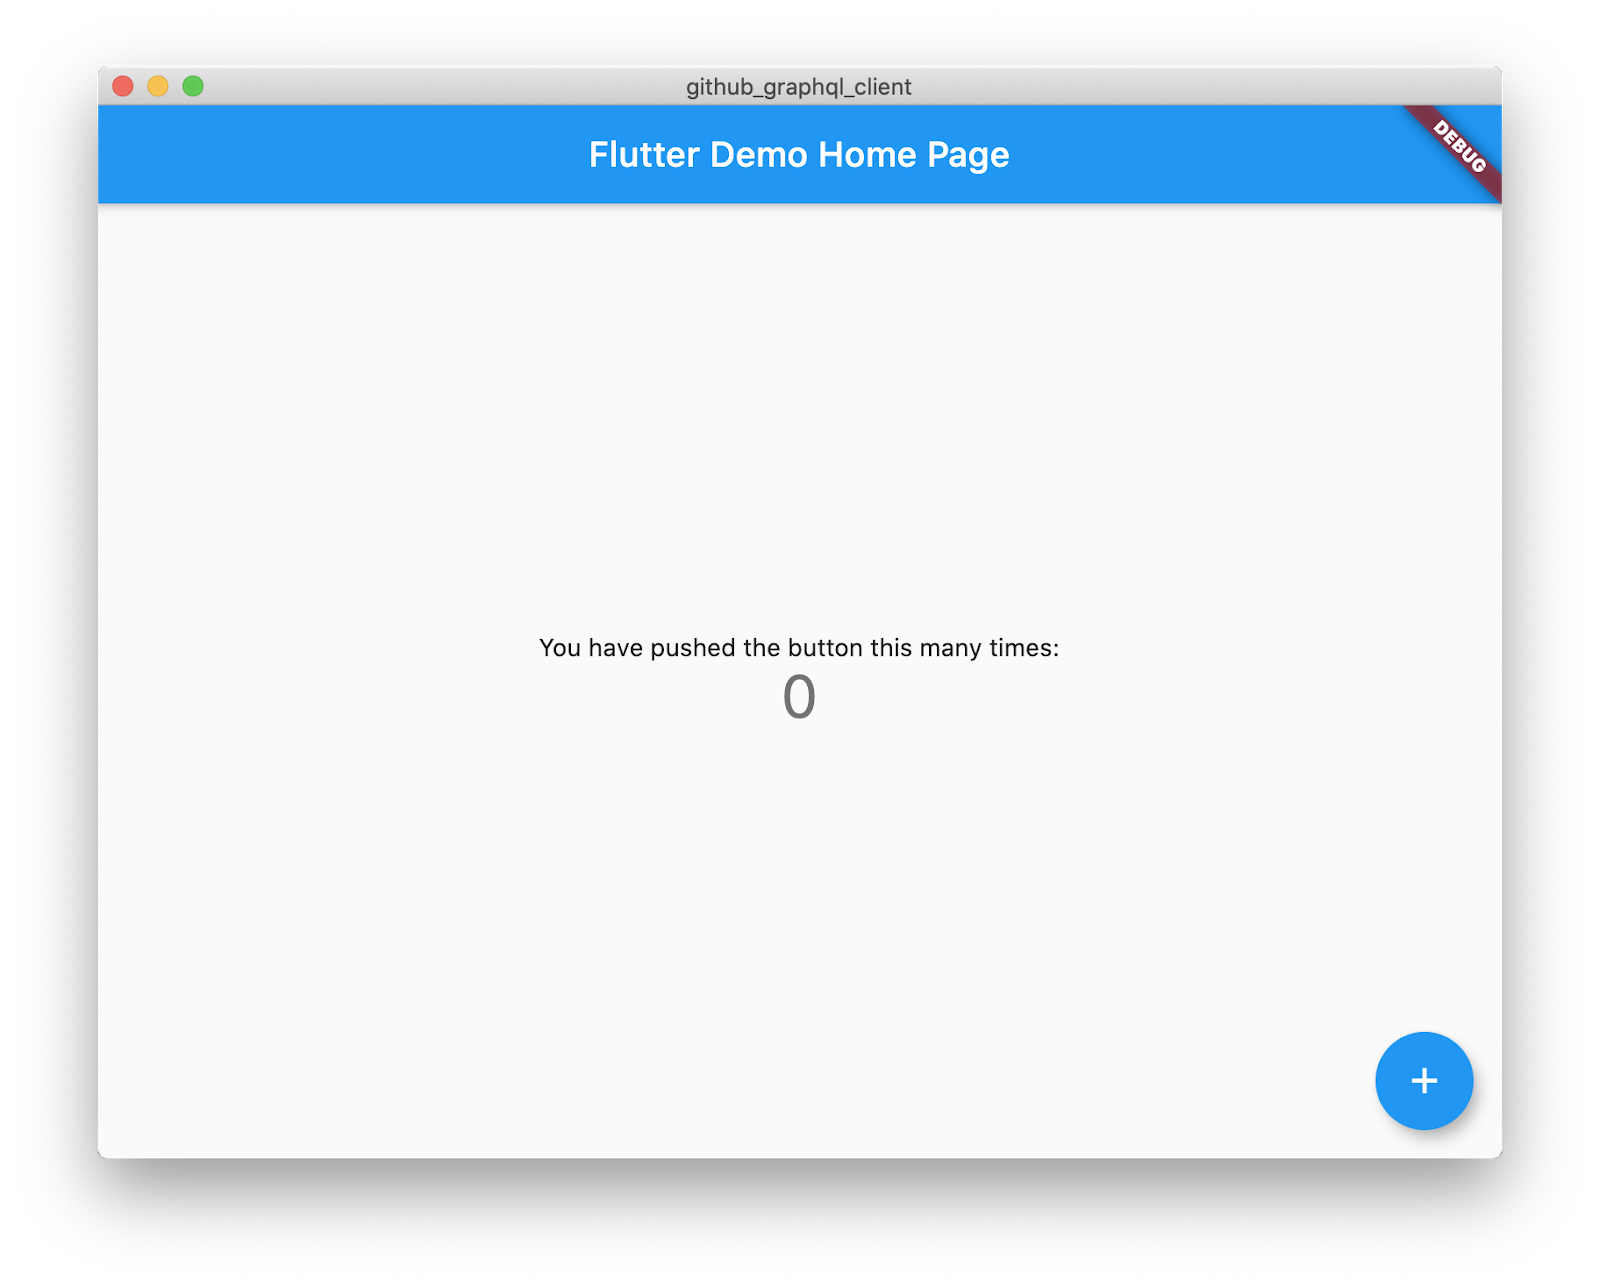
Here is a screenshot of the desktop application that you will build, running on macOS.
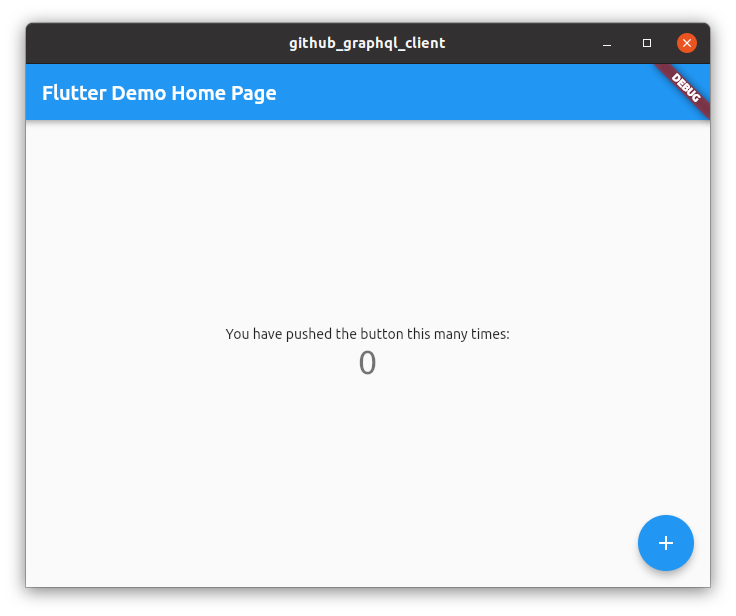
Likewise, here is the same application running on Ubuntu Linux.

This codelab focuses on adding GraphQL capabilities to a Flutter desktop app. Non-relevant concepts and code blocks are glossed over, and are provided for you to simply copy and paste.
What would you like to learn from this codelab?
You must develop on the platform where you plan to deploy. So, if you want a macOS desktop app, you must develop on macOS.
You need the following software to complete this lab:
For developing the macOS desktop application, you also need:
For developing the Linux desktop application, you also need:
Installing these requirements varies depending on which Linux distribution you are using, but the following is what you could use to install the above software on Ubuntu.
$ sudo apt-get install clang cmake ninja-build pkg-config libgtk-3-devThis codelab is currently written for macOS and Linux, but will be updated to also cover Windows as Flutter becomes available for that platform.
For more information, see the documentation at flutter.dev/desktop.
Get started developing desktop applications with Flutter
The first step to develop Flutter desktop applications is to configure Flutter to use the dev channel because Flutter for desktop is still under development. You also need to configure desktop support as a one-time configuration setup.
$ flutter channel dev
$ flutter upgrade
$ flutter config --enable-macos-desktop # on macOS
$ flutter config --enable-linux-desktop # on Linux
To confirm that Flutter for desktop is enabled, run the following command.
$ flutter devices
1 connected device:

macOS desktop • macos • darwin-x64 • Mac OS X 10.15.5 19F101
Linux desktop • linux • linux-x64 • Linux
If you do not see the macOS line shown in the preceding output, consider the following:
- Are you developing on the macOS platform? This is required for developing macOS desktop applications.
- Does running
flutter configlist macOS as enabled withenable-macos-desktop: true? - Does running
flutter channellist eitherdevormasteras the current channel? This is required as the code will not run on thestableorbetachannels.
If you do not see the Linux line shown in the preceding output, consider the following:
- Are you developing on the Linux platform? This is required for developing Linux desktop applications.
- Does running
flutter configlist Linux as enabled withenable-linux-desktop: true? - Does running
flutter channellist eitherdevormasteras the current channel? This is required as the code will not run on thestableorbetachannels.
An easy way to get started writing Flutter for desktop apps is to use the Flutter command-line tool to create a Flutter project. Alternatively, your IDE may provide a workflow for creating a Flutter project through its UI.
$ flutter create github_graphql_client
Creating project github_graphql_client...
[Eliding listing of created files]
Wrote 102 files.

All done!
[✓] Flutter: is fully installed. (Channel dev, 1.20.0-0.0.pre, on Mac OS X
    10.15.5 19F101, locale en)
[✓] Android toolchain - develop for Android devices: is fully installed.
    (Android SDK version 29.0.3)
[✓] Xcode - develop for iOS and macOS: is fully installed. (Xcode 11.5)
[✓] Chrome - develop for the web: is fully installed.
[✓] Android Studio: is fully installed. (version 3.6)
[✓] VS Code: is fully installed. (version 1.46.0)
[✓] Connected device: is fully installed. (3 available)

In order to run your application, type:

  $ cd github_graphql_client
  $ flutter run

Your application code is in github_graphql_client/lib/main.dart.
For the purpose of simplifying this codelab, delete the Android, iOS, and web support files. These files are not required for Flutter for a macOS or Linux desktop application. Deleting the files helps to eliminate accidentally running the wrong variant during this codelab.
$ cd github_graphql_client
$ rm -r android ios web test
To make sure everything is working, run the boilerplate Flutter application as a macOS or Linux desktop application as shown below. Alternatively, open this project in your IDE, and use its tooling to run the application. Thanks to the previous step, running as a macOS or Linux application should be the only available option.
$ flutter run
Launching lib/main.dart on macOS in debug mode...
Building macOS application...
Waiting for macOS to report its views...                             7ms
Syncing files to device macOS...                                   175ms

Flutter run key commands.
r Hot reload. 🔥🔥🔥
R Hot restart.
h Repeat this help message.
d Detach (terminate "flutter run" but leave application running).
c Clear the screen
q Quit (terminate the application on the device).
An Observatory debugger and profiler on macOS is available at:
http://127.0.0.1:64038/eYVk5rU71n0=/
You should now see the following application window on your screen. Go ahead and click the floating action button to make sure that the incrementer works as expected. You can also try hot reload by changing the theme color by or altering the behavior of the _incrementCounter method in lib/main.dart.
Here is the application running on macOS.
Here it is again, this time on Linux.
In the next section you'll authenticate on GitHub using OAuth2.
Authenticate on desktop
If you use Flutter on Android, iOS, or the web, you have a plethora of options with regard to authentication packages. Developing for desktop, however, changes the equation. Currently, you must build authentication integration from scratch, but this will change as package authors implement Flutter for desktop support.
Register a GitHub OAuth application
To build a desktop application that uses GitHub's APIs, first you need to authenticate. There are multiple options available, but the best user experience is to direct the user through GitHub's OAuth2 login flow in their browser. This enables handling of two-factor authentication and effortless integration of password managers.
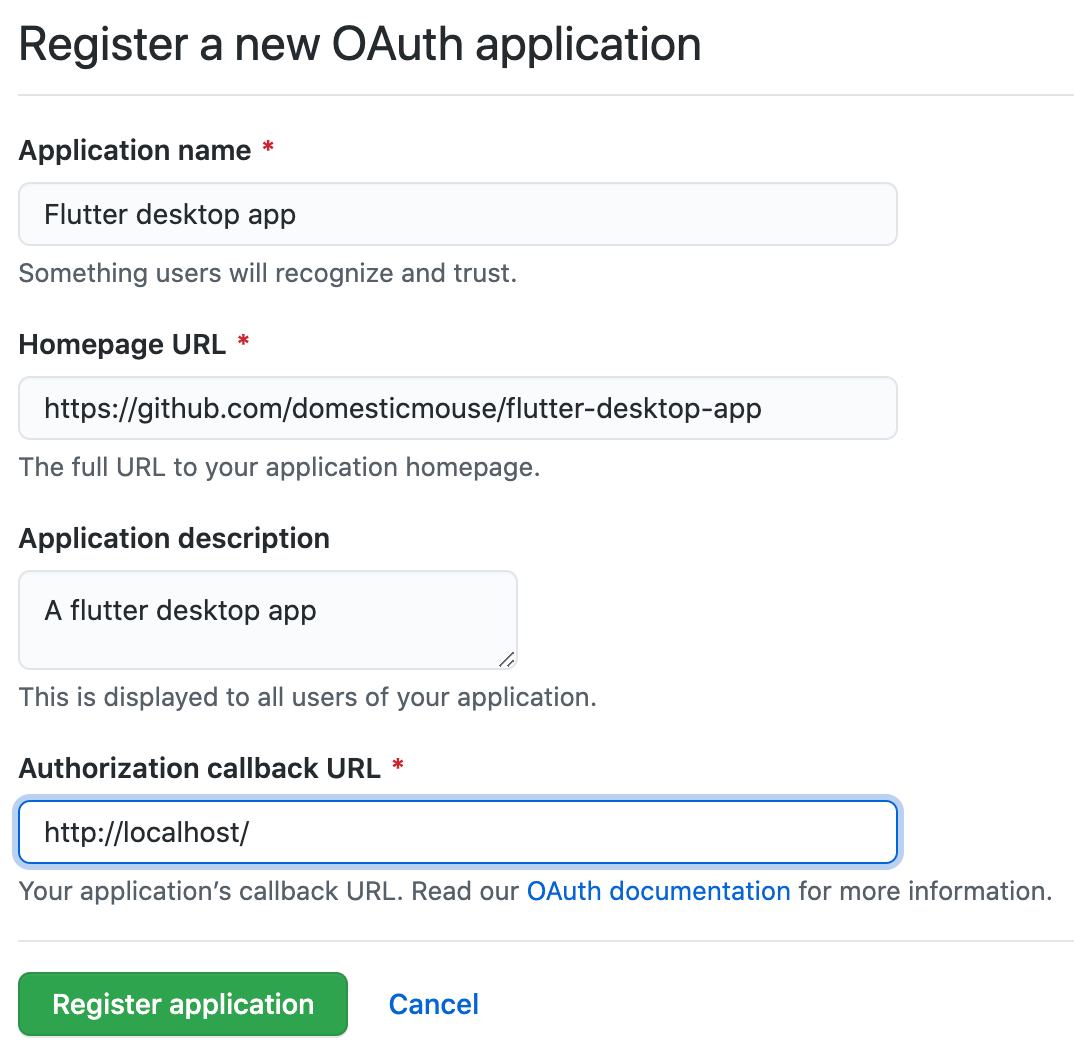
To register an application for GitHub's OAuth2 flow, surf to github.com and follow the instructions in only the first step of GitHub's Building OAuth Apps. The following steps are important for when you have an application to launch, but not while doing a codelab.
In completing Creating an OAuth App, Step 8 asks you to provide the Authorization callback URL. For a desktop app, enter http://localhost/ as the callback URL. GitHub's OAuth2 flow was set up such that defining a localhost callback URL allows any port, enabling you to stand up a web server on an ephemeral local high port. This avoids asking the user to copy the OAuth code token into the application as part of the OAuth process..
Here's an example screenshot of how to fill in the form for creating a GitHub OAuth application:
After you register an OAuth app in the GitHub admin interface you will receive a client ID and a client secret. If you need these values at a later time, you can retrieve them from GitHub's developer settings. You need these credentials in your application in order to construct a valid OAuth2 authorization URL. You will use the oauth2 Dart package to handle the OAuth2 flow, and the url_launcher Flutter plugin to enable launching the user's web browser.
Add oauth2 and url_launcher to pubspec.yaml
You add package dependencies for your application by adding entries to the pubspec.yaml file, as follows:
pubspec.yaml
name: github_graphql_client
description: Github client using Github API V4 (GraphQL)
publish_to: 'none'
version: 1.0.0+1

environment:
  sdk: ">=2.7.0 <3.0.0"

dependencies:
  flutter:
    sdk: flutter
  http: ^0.12.1         # Add this line,
  oauth2: ^1.6.1        # this line,
  url_launcher: ^5.4.10 # and this line.

dev_dependencies:
  pedantic: ^1.9.0

flutter:
  uses-material-design: true
Include client credentials
Add client credentials to a new file, lib/github_oauth_credentials.dart, as follows:
lib/github_oauth_credentials.dart
// TODO(CodelabUser): Create an OAuth App
const githubClientId = 'YOUR_GITHUB_CLIENT_ID_HERE';
const githubClientSecret = 'YOUR_GITHUB_CLIENT_SECRET_HERE';

// OAuth scopes for repository and user information
const githubScopes = ['repo', 'read:org'];
Copy and paste your client credentials from the previous step into this file.
Build the desktop OAuth2 flow
Build a widget to contain the desktop OAuth2 flow. This is a reasonably complicated chunk of logic, because you must run up a temporary web server, redirect the user to an endpoint on GitHub in their web browser, wait for the user to complete the authorization flow in their browser, and handle a redirect call from GitHub that contains code (which then needs to be converted into an OAuth2 token with a separate call to GitHub's API servers).
lib/src/github_login.dart
import 'dart:io';
import 'package:flutter/material.dart';
import 'package:http/http.dart' as http;
import 'package:oauth2/oauth2.dart' as oauth2;
import 'package:url_launcher/url_launcher.dart';

final _authorizationEndpoint =
    Uri.parse('https://github.com/login/oauth/authorize');
final _tokenEndpoint = Uri.parse('https://github.com/login/oauth/access_token');

class GithubLoginWidget extends StatefulWidget {
  const GithubLoginWidget({
    @required this.builder,
    @required this.githubClientId,
    @required this.githubClientSecret,
    @required this.githubScopes,
  });
  final AuthenticatedBuilder builder;
  final String githubClientId;
  final String githubClientSecret;
  final List<String> githubScopes;

  @override
  _GithubLoginState createState() => _GithubLoginState();
}

typedef AuthenticatedBuilder = Widget Function(
    BuildContext context, oauth2.Client client);

class _GithubLoginState extends State<GithubLoginWidget> {
  HttpServer _redirectServer;
  oauth2.Client _client;

  @override
  Widget build(BuildContext context) {
    if (_client != null) {
      return widget.builder(context, _client);
    }

    return Scaffold(
      appBar: AppBar(
        title: const Text('Github Login'),
      ),
      body: Center(
        child: RaisedButton(
          onPressed: () async {
            await _redirectServer?.close();
            // Bind to an ephemeral port on localhost
            _redirectServer = await HttpServer.bind('localhost', 0);
            var authenticatedHttpClient = await _getOAuth2Client(
                Uri.parse('http://localhost:${_redirectServer.port}/auth'));
            setState(() {
              _client = authenticatedHttpClient;
            });
          },
          child: const Text('Login to Github'),
        ),
      ),
    );
  }

  Future<oauth2.Client> _getOAuth2Client(Uri redirectUrl) async {
    if (widget.githubClientId.isEmpty || widget.githubClientSecret.isEmpty) {
      throw const GithubLoginException(
          'githubClientId and githubClientSecret must be not empty. '
          'See `lib/github_oauth_credentials.dart` for more detail.');
    }
    var grant = oauth2.AuthorizationCodeGrant(
      widget.githubClientId,
      _authorizationEndpoint,
      _tokenEndpoint,
      secret: widget.githubClientSecret,
      httpClient: _JsonAcceptingHttpClient(),
    );
    var authorizationUrl =
        grant.getAuthorizationUrl(redirectUrl, scopes: widget.githubScopes);

    await _redirect(authorizationUrl);
    var responseQueryParameters = await _listen();
    var client =
        await grant.handleAuthorizationResponse(responseQueryParameters);
    return client;
  }

  Future<void> _redirect(Uri authorizationUrl) async {
    var url = authorizationUrl.toString();
    if (await canLaunch(url)) {
      await launch(url);
    } else {
      throw GithubLoginException('Could not launch $url');
    }
  }

  Future<Map<String, String>> _listen() async {
    var request = await _redirectServer.first;
    var params = request.uri.queryParameters;
    request.response.statusCode = 200;
    request.response.headers.set('content-type', 'text/plain');
    request.response.writeln('Authenticated! You can close this tab.');
    await request.response.close();
    await _redirectServer.close();
    _redirectServer = null;
    return params;
  }
}

class _JsonAcceptingHttpClient extends http.BaseClient {
  final _httpClient = http.Client();
  @override
  Future<http.StreamedResponse> send(http.BaseRequest request) {
    request.headers['Accept'] = 'application/json';
    return _httpClient.send(request);
  }
}

class GithubLoginException implements Exception {
  const GithubLoginException(this.message);
  final String message;
  @override
  String toString() => message;
}
It's worth spending some time working through this code because it demonstrates some of the capabilities of using Flutter and Dart on the desktop. Yes, the code is complicated, but a lot of functionality is encapsulated in a relatively easy-to-use widget.
This widget exposes a temporary web server and makes secure HTTP requests. On macOS, both of these capabilities need to be requested through entitlements files.
Change client and server entitlements (macOS only)
Making web requests and running a web server as a macOS desktop app requires changes to the entitlements for the application. For more information, see Entitlements and the App Sandbox.
macos/Runner/DebugProfile.entitlements
<?xml version="1.0" encoding="UTF-8"?>
<!DOCTYPE plist PUBLIC "-//Apple//DTD PLIST 1.0//EN" "http://www.apple.com/DTDs/PropertyList-1.0.dtd">
<plist version="1.0">
<dict>
        <key>com.apple.security.app-sandbox</key>
        <true/>
        <key>com.apple.security.cs.allow-jit</key>
        <true/>
        <key>com.apple.security.network.server</key>
        <true/>
        <!-- Add this entry -->
        <key>com.apple.security.network.client</key>
        <true/>
</dict>
</plist>
You also need to modify the Release entitlements for production builds.
macos/Runner/Release.entitlements
<?xml version="1.0" encoding="UTF-8"?>
<!DOCTYPE plist PUBLIC "-//Apple//DTD PLIST 1.0//EN" "http://www.apple.com/DTDs/PropertyList-1.0.dtd">
<plist version="1.0">
<dict>
        <key>com.apple.security.app-sandbox</key>
        <true/>
        <!-- Add the following two entries -->
        <key>com.apple.security.network.server</key>
        <true/>
        <key>com.apple.security.network.client</key>
        <true/>
</dict>
</plist>
Put it all together
You've configured a new OAuth app, the project is configured with the required packages and plugins, you've authored a widget to encapsulate the OAuth authentication flow, and you've enabled the app to act as both a network client and server on macOS through entitlements. With all of these required building blocks in place, you can bring it all together in the lib/main.dart file.
lib/main.dart
import 'package:flutter/material.dart';
import 'github_oauth_credentials.dart';
import 'src/github_login.dart';
void main() {
runApp(MyApp());
}
class MyApp extends StatelessWidget {
@override
Widget build(BuildContext context) {
return MaterialApp(
title: 'GitHub GraphQL API Client',
theme: ThemeData(
primarySwatch: Colors.blue,
visualDensity: VisualDensity.adaptivePlatformDensity,
),
home: MyHomePage(title: 'GitHub GraphQL API Client'),
);
}
}
class MyHomePage extends StatelessWidget {
MyHomePage({Key key, this.title}) : super(key: key);
final String title;
@override
Widget build(BuildContext context) {
return GithubLoginWidget(
builder: (context, httpClient) {
return Scaffold(
appBar: AppBar(
title: Text(title),
),
body: Center(
child: Text(
'You are logged in to GitHub!',
),
),
);
},
githubClientId: githubClientId,
githubClientSecret: githubClientSecret,
githubScopes: githubScopes,
);
}
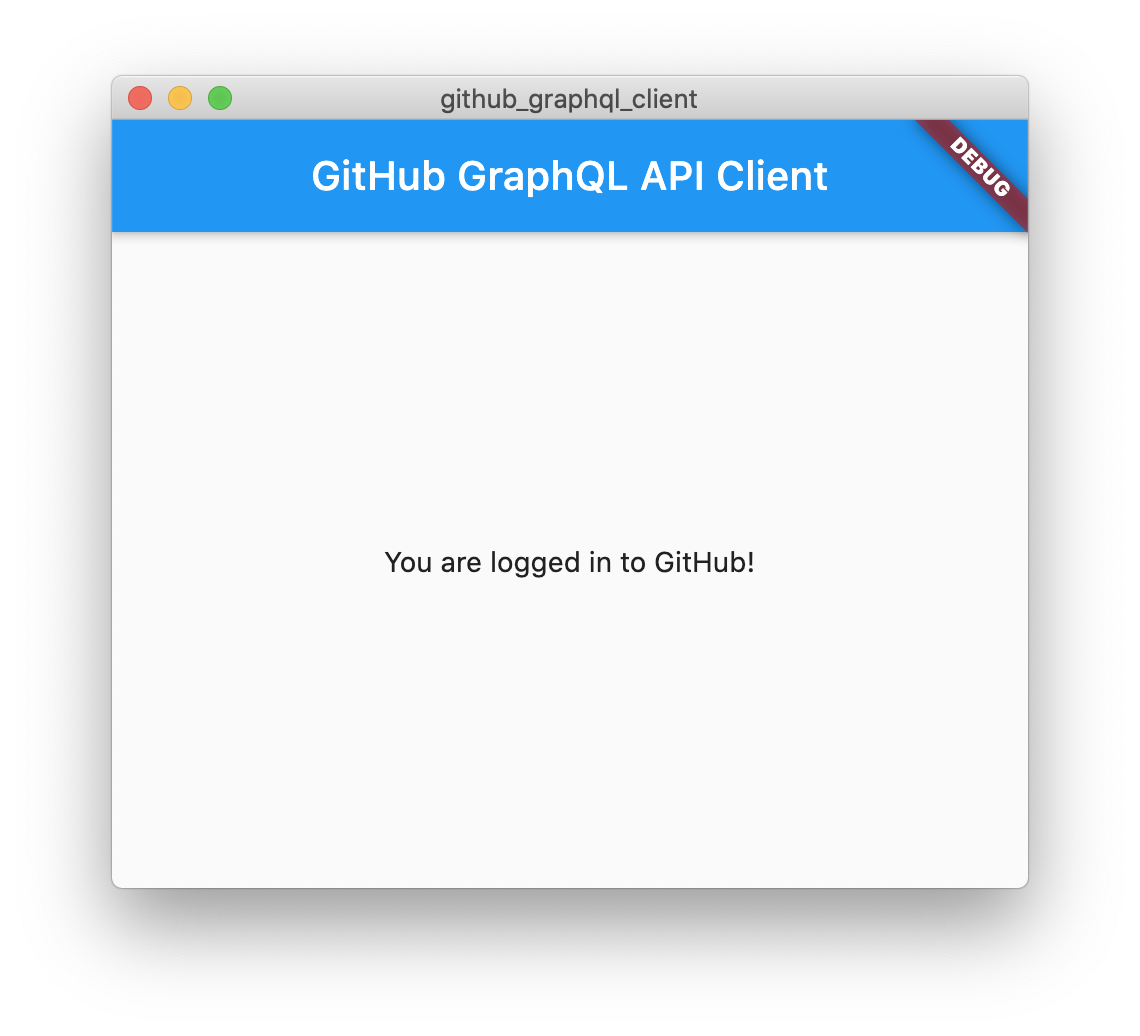
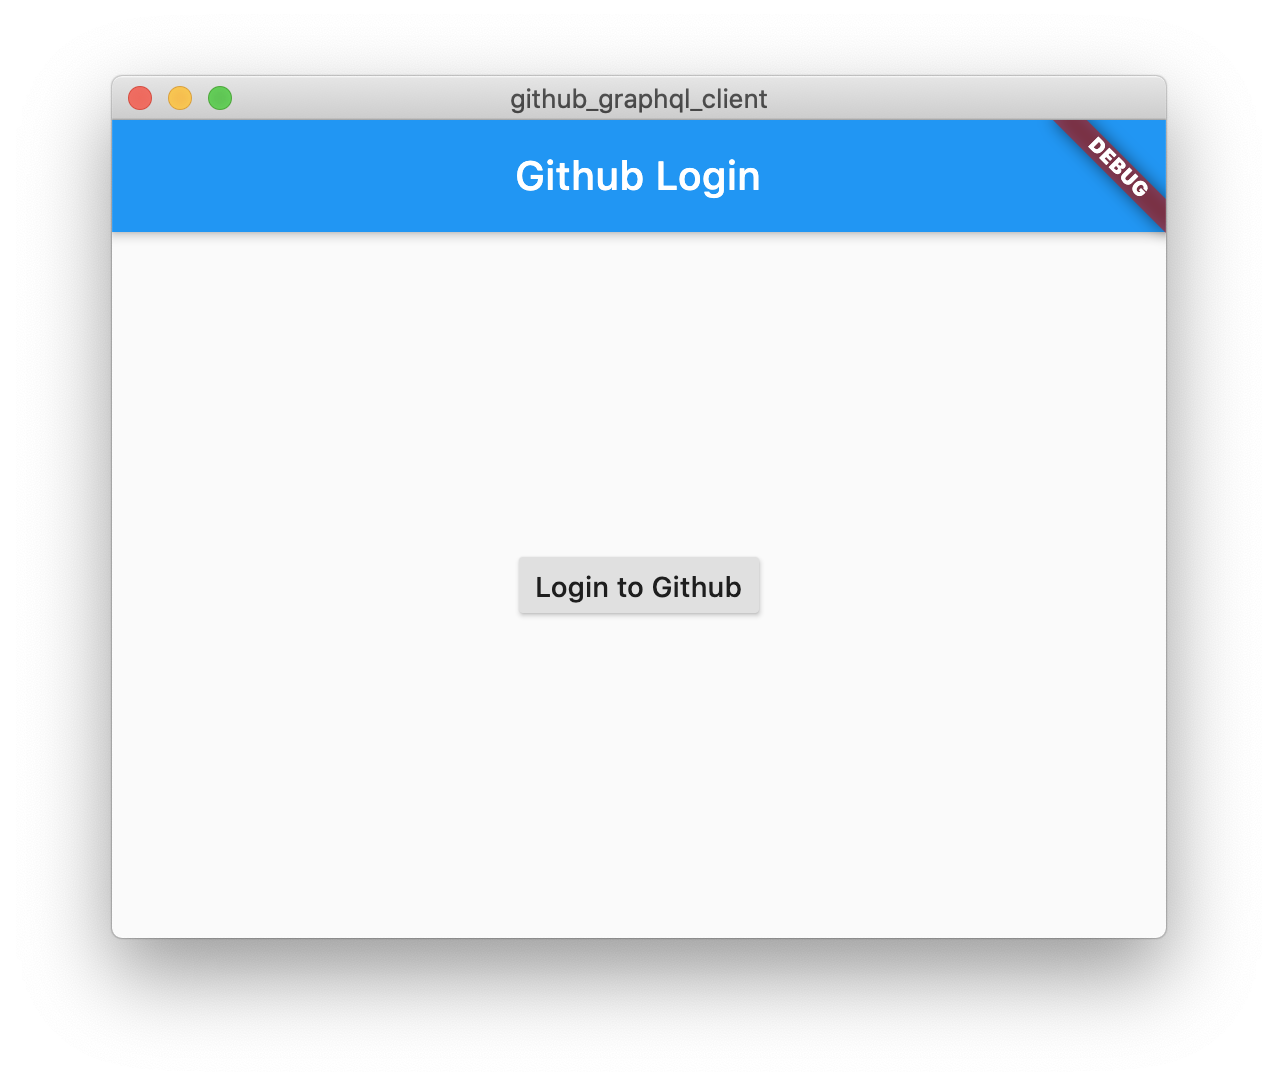
}When you run this Flutter application, you are initially presented with a button to initiate the GitHub OAuth login flow. After clicking the button, complete the login flow in your web browser, to see that the app is now logged in.
|
|

Now that you conquered OAuth authentication, you can get started using the GitHub GraphQL API.
Introduction to GraphQL
Cherry-picking from graphql.org, GraphQL provides a complete and understandable description of the data in your API, and gives clients the power to ask for exactly what they need and nothing more. This is very real upside for developers—being able to ask the API focused questions that populate specific parts of a UI.
GitHub's v4 API is defined in terms of GraphQL, giving an excellent playground for exploring GraphQL with real data. GitHub provides GitHub GraphQL Explorer, powered by GraphiQL, which gives you a way to create GraphQL queries against GitHub's GraphQL API. For more information about how to use GitHub GraphQL Explorer, see Using the Explorer on GitHub.
In this codelab you will use the gql package to code-generate type-safe marshalling code for the queries you build in the Explorer.
Add more dependencies
To use code generation to build the GraphQL client library, you need build_runner, and plenty of gql packages. Start by adding these dependencies to your pubspec.yaml file:
pubspec.yaml
name: github_graphql_client
description: Github client using Github API V4 (GraphQL)
publish_to: 'none'
version: 1.0.0+1

environment:
  sdk: ">=2.7.0 <3.0.0"

dependencies:
  flutter:
    sdk: flutter
  gql: ^0.12.3               # Add from here,
  gql_exec: ^0.2.4           #
  gql_link: ^0.3.0           #
  gql_http_link: ^0.2.9      # to here.
  http: ^0.12.1
  oauth2: ^1.6.1
  url_launcher: ^5.4.10

dev_dependencies:
  build_runner: ^1.10.0      # And these two,
  gql_build: ^0.0.11         # as well.
  pedantic: ^1.9.0

flutter:
  uses-material-design: true
Retrieve GitHub's GraphQL Schema
GitHub publishes a schema that describes their API. You cache this schema so that your code generation tooling can use it to create type-safe client libraries for your queries.
$ mkdir -p lib/third_party/github_graphql_schema
$ ( cd lib/third_party/github_graphql_schema && wget https://developer.github.com/v4/public_schema/schema.public.graphql )
The preceding two commands create a schema.public.graphql that the code generation pipeline uses to type check your queries and generate type-safe client libraries. You also need a query. Start with the default query that the GitHub GraphQL Explorer starts with, with one slight alteration. You need to give the query a name, in order for the code generator to generate your type safe client library.
lib/src/github_gql/github_queries.graphql
query ViewerDetail {
  viewer {
    login
  }
}
Configure build_runner
To configure build_runner, you add rules to build.yaml. In this case, you configure how the gql package generates code from the GitHub GraphQL schema and the queries you create in the Explorer.
build.yaml
targets:
  $default:
    builders:
      gql_build|schema_builder:
        enabled: true
      gql_build|ast_builder:
        enabled: true
      gql_build|op_builder:
        enabled: true
        options:
          schema: github_graphql_client|lib/third_party/github_graphql_schema/schema.public.graphql
      gql_build|data_builder:
        enabled: true
        options:
          schema: github_graphql_client|lib/third_party/github_graphql_schema/schema.public.graphql
      gql_build|req_builder:
        enabled: true
        options:
          schema: github_graphql_client|lib/third_party/github_graphql_schema/schema.public.graphql
      gql_build|var_builder:
        enabled: true
        options:
          schema: github_graphql_client|lib/third_party/github_graphql_schema/schema.public.graphql
The build_runner package is quite powerful, more so than can be covered here. If you want to see a deep dive, review Kevin Moore's Code generation with the Dart build system on YouTube.
Now that you have all the parts in place, you can run build_runner to generate your GraphQL client library.
$ flutter pub run build_runner build --delete-conflicting-outputsIf you look through lib/third_party/github_graphql_schema/ and lib/src/github_gql/, you'll see that you now have a lot of newly generated code.
Put it all together, again
It's time to integrate all of the GraphQL goodness into your lib/main.dart file.
lib/main.dart
import 'package:flutter/material.dart';
import 'package:gql_exec/gql_exec.dart';
import 'package:gql_link/gql_link.dart';
import 'package:gql_http_link/gql_http_link.dart';
import 'github_oauth_credentials.dart';
import 'src/github_gql/github_queries.data.gql.dart';
import 'src/github_gql/github_queries.req.gql.dart';
import 'src/github_login.dart';
void main() {
runApp(MyApp());
}
class MyApp extends StatelessWidget {
@override
Widget build(BuildContext context) {
return MaterialApp(
title: 'GitHub GraphQL API Client',
theme: ThemeData(
primarySwatch: Colors.blue,
visualDensity: VisualDensity.adaptivePlatformDensity,
),
home: MyHomePage(title: 'GitHub GraphQL API Client'),
);
}
}
class MyHomePage extends StatelessWidget {
MyHomePage({Key key, this.title}) : super(key: key);
final String title;
@override
Widget build(BuildContext context) {
return GithubLoginWidget(
builder: (context, httpClient) {
final link = HttpLink(
'https://api.github.com/graphql',
httpClient: httpClient,
);
return FutureBuilder<$ViewerDetail$viewer>(
future: viewerDetail(link),
builder: (context, snapshot) {
return Scaffold(
appBar: AppBar(
title: Text(title),
),
body: Center(
child: Text(
snapshot.hasData
? 'Hello ${snapshot.data.login}!'
: 'Retrieving viewer login details...',
),
),
);
},
);
},
githubClientId: githubClientId,
githubClientSecret: githubClientSecret,
githubScopes: githubScopes,
);
}
}
Future<$ViewerDetail$viewer> viewerDetail(Link link) async {
var result = await link.request(ViewerDetail((b) => b)).first;
if (result.errors != null && result.errors.isNotEmpty) {
throw QueryException(result.errors);
}
return $ViewerDetail(result.data).viewer;
}
class QueryException implements Exception {
QueryException(this.errors);
List<GraphQLError> errors;
@override
String toString() {
return 'Query Exception: ${errors.map((err) => '$err').join(',')}';
}
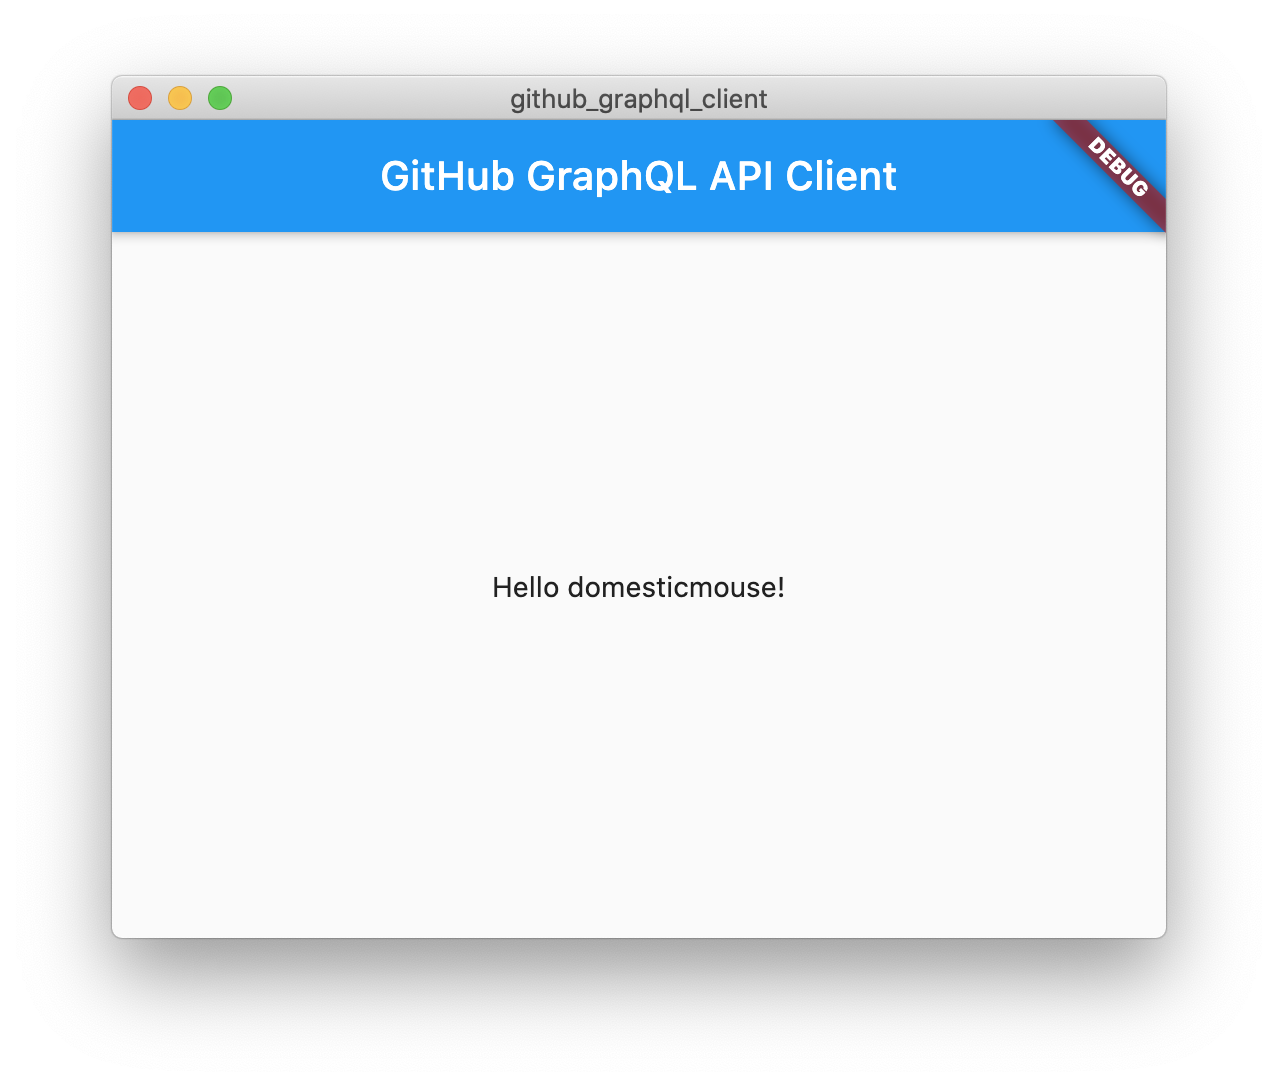
}After you run this Flutter application, a button that initiates the GitHub OAuth login flow is displayed. After you click the button, complete the login flow in your web browser. You are now logged in to the app.
|
|
In the next step, you'll eliminate an annoyance in the current code base. You'll bring the application back to the foreground after authenticating the application in the web browser.
Tidy up annoyances
Currently, the code has an annoying aspect. After the authentication flow, when GitHub has authenticated your application, you are left staring at a web browser page. Ideally, you should automatically return to the application. Fixing this requires creating a Flutter plugin for macOS and/or Linux.
Create a Flutter plugin for macOS and/or Linux
To have the application automatically bring itself to the front of the stack of application windows after the OAuth flow completes requires some native code. For macOS, the API you need is the NSApplication's activate(ignoringOtherApps:) instance method, while for Linux we will use gtk_window_present. To be able to call this API, you need to create a Flutter plugin.
You can use flutter to create a new plugin project.
$ cd .. # step outside of the github_graphql_client project
$ flutter create -t plugin --platforms=linux,macos window_to_front
Now you can customize that project to handle macOS and Linux.
$ cd window_to_front
$ rm -r android ios example test
Configure the plugin's pubspec.yaml to only work for macOS by deleting the Android and iOS configuration section.
../window_to_front/pubspec.yaml
name: window_to_front
description: A new flutter plugin project.
version: 0.0.1

environment:
  sdk: ">=2.7.0 <3.0.0"
  flutter: ">=1.10.0"

dependencies:
  flutter:
    sdk: flutter

flutter:
  plugin:
    platforms:
      # android:
      #   package: com.example.window_to_front
      #   pluginClass: WindowToFrontPlugin
      # ios:
      #   pluginClass: WindowToFrontPlugin
      linux:
        pluginClass: WindowToFrontPlugin
      macos:
        pluginClass: WindowToFrontPlugin
You've set up the configuration of this plugin for macOS and Linux. Now, you can add the Swift code that pop's the window forward. Edit macos/Classes/WindowToFrontPlugin.swift, as follows:
../window_to_front/macos/Classes/WindowToFrontPlugin.swift
import Cocoa
import FlutterMacOS

public class WindowToFrontPlugin: NSObject, FlutterPlugin {
  public static func register(with registrar: FlutterPluginRegistrar) {
    let channel = FlutterMethodChannel(name: "window_to_front", binaryMessenger: registrar.messenger)
    let instance = WindowToFrontPlugin()
    registrar.addMethodCallDelegate(instance, channel: channel)
  }

  public func handle(_ call: FlutterMethodCall, result: @escaping FlutterResult) {
    switch call.method {
    // Add from here
    case "activate":
      NSApplication.shared.activate(ignoringOtherApps: true)
      result(nil)
    // to here.
    // Delete the getPlatformVersion case,
    // as we won't be using it.
    default:
      result(FlutterMethodNotImplemented)
    }
  }
}
To do the same in the Linux plugin, replace the contents of linux/window_to_front_plugin.cc with the following:
../window_to_front/linux/window_to_front_plugin.cc
#include "include/window_to_front/window_to_front_plugin.h"

#include <flutter_linux/flutter_linux.h>
#include <gtk/gtk.h>
#include <sys/utsname.h>

#define WINDOW_TO_FRONT_PLUGIN(obj) \
  (G_TYPE_CHECK_INSTANCE_CAST((obj), window_to_front_plugin_get_type(), \
                              WindowToFrontPlugin))

struct _WindowToFrontPlugin {
  GObject parent_instance;

  FlPluginRegistrar* registrar;
};

G_DEFINE_TYPE(WindowToFrontPlugin, window_to_front_plugin, g_object_get_type())

// Called when a method call is received from Flutter.
static void window_to_front_plugin_handle_method_call(
    WindowToFrontPlugin* self,
    FlMethodCall* method_call) {
  g_autoptr(FlMethodResponse) response = nullptr;

  const gchar* method = fl_method_call_get_name(method_call);

  if (strcmp(method, "activate") == 0) {
    FlView* view = fl_plugin_registrar_get_view(self->registrar);
    if (view != nullptr) {
      GtkWindow* window = GTK_WINDOW(gtk_widget_get_toplevel(GTK_WIDGET(view)));
      gtk_window_present(window);
    }

    response = FL_METHOD_RESPONSE(fl_method_success_response_new(nullptr));
  } else {
    response = FL_METHOD_RESPONSE(fl_method_not_implemented_response_new());
  }

  fl_method_call_respond(method_call, response, nullptr);
}

static void window_to_front_plugin_dispose(GObject* object) {
  G_OBJECT_CLASS(window_to_front_plugin_parent_class)->dispose(object);
}

static void window_to_front_plugin_class_init(WindowToFrontPluginClass* klass) {
  G_OBJECT_CLASS(klass)->dispose = window_to_front_plugin_dispose;
}

static void window_to_front_plugin_init(WindowToFrontPlugin* self) {}

static void method_call_cb(FlMethodChannel* channel, FlMethodCall* method_call,
                           gpointer user_data) {
  WindowToFrontPlugin* plugin = WINDOW_TO_FRONT_PLUGIN(user_data);
  window_to_front_plugin_handle_method_call(plugin, method_call);
}

void window_to_front_plugin_register_with_registrar(FlPluginRegistrar* registrar) {
  WindowToFrontPlugin* plugin = WINDOW_TO_FRONT_PLUGIN(
      g_object_new(window_to_front_plugin_get_type(), nullptr));

  plugin->registrar = FL_PLUGIN_REGISTRAR(g_object_ref(registrar));

  g_autoptr(FlStandardMethodCodec) codec = fl_standard_method_codec_new();
  g_autoptr(FlMethodChannel) channel =
      fl_method_channel_new(fl_plugin_registrar_get_messenger(registrar),
                            "window_to_front",
                            FL_METHOD_CODEC(codec));
  fl_method_channel_set_method_call_handler(channel, method_call_cb,
                                            g_object_ref(plugin),
                                            g_object_unref);

  g_object_unref(plugin);
}
Add the code to make the native functionality we created above available to the world of Flutter.
../window_to_front/lib/window_to_front.dart
import 'dart:async';

import 'package:flutter/services.dart';

class WindowToFront {
  static const MethodChannel _channel = const MethodChannel('window_to_front');
  // Add from here
  static Future<void> activate() async {
    await _channel.invokeMethod('activate');
  }
  // to here.

  // Delete the getPlatformVersion getter method.
}
This Flutter plugin is complete, and you can go back to editing the github_graphql_client project.
$ cd ../github_graphql_clientAdd dependencies
The Flutter plugin you just created is great, but it isn't much use to anyone sitting by itself. You need to add it as a dependency in your Flutter application in order to use it.
pubspec.yaml
name: github_graphql_client
description: Github client using Github API V4 (GraphQL)
publish_to: 'none'
version: 1.0.0+1

environment:
  sdk: ^2.9.0-14.0.dev
  flutter: ^1.20.0-0.0.pre

dependencies:
  flutter:
    sdk: flutter
  gql: ^0.12.3
  gql_exec: ^0.2.4
  gql_link: ^0.3.0
  gql_http_link: ^0.2.9
  gql_transform_link: ^0.1.5
  http: ^0.12.1
  oauth2: ^1.6.1
  url_launcher: ^5.4.10
  window_to_front:       # Add this dependency
    path: '../window_to_front'

dev_dependencies:
  build_runner: ^1.10.0
  gql_build: ^0.0.11
  pedantic: ^1.9.0

flutter:
  uses-material-design: true
Note the path specified for the window_to_front dependency: because this is a local package instead of one published to pub.dev, you specify a path instead of a version number.
Put it all together, again, again
It's time to integrate window_to_front into your lib/main.dart file. We only need to add an import and call into the native code at the right time.
lib/main.dart
import 'package:flutter/material.dart';
import 'package:gql_exec/gql_exec.dart';
import 'package:gql_link/gql_link.dart';
import 'package:gql_http_link/gql_http_link.dart';
import 'package:window_to_front/window_to_front.dart'; // Add this.
import 'github_oauth_credentials.dart';
import 'src/github_gql/github_queries.data.gql.dart';
import 'src/github_gql/github_queries.req.gql.dart';
import 'src/github_login.dart';

void main() {
  runApp(MyApp());
}

class MyApp extends StatelessWidget {
  @override
  Widget build(BuildContext context) {
    return MaterialApp(
      title: 'GitHub GraphQL API Client',
      theme: ThemeData(
        primarySwatch: Colors.blue,
        visualDensity: VisualDensity.adaptivePlatformDensity,
      ),
      home: MyHomePage(title: 'GitHub GraphQL API Client'),
    );
  }
}

class MyHomePage extends StatelessWidget {
  MyHomePage({Key key, this.title}) : super(key: key);
  final String title;

  @override
  Widget build(BuildContext context) {
    return GithubLoginWidget(
      builder: (context, httpClient) {
        WindowToFront.activate();                      // And this.
        final link = HttpLink(
          'https://api.github.com/graphql',
          httpClient: httpClient,
        );
        return FutureBuilder<$ViewerDetail$viewer>(
          future: viewerDetail(link),
          builder: (context, snapshot) {
            return Scaffold(
              appBar: AppBar(
                title: Text(title),
              ),
              body: Center(
                child: Text(
                  snapshot.hasData
                      ? 'Hello ${snapshot.data.login}!'
                      : 'Retrieving viewer login details...',
                ),
              ),
            );
          },
        );
      },
      githubClientId: githubClientId,
      githubClientSecret: githubClientSecret,
      githubScopes: githubScopes,
    );
  }
}

Future<$ViewerDetail$viewer> viewerDetail(Link link) async {
  var result = await link.request(ViewerDetail((b) => b)).first;
  if (result.errors != null && result.errors.isNotEmpty) {
    throw QueryException(result.errors);
  }
  return $ViewerDetail(result.data).viewer;
}

class QueryException implements Exception {
  QueryException(this.errors);
  List<GraphQLError> errors;
  @override
  String toString() {
    return 'Query Exception: ${errors.map((err) => '$err').join(',')}';
  }
}
In the next section, you'll build on the base that you have, to create a desktop GitHub client that gives you insight into what you have on GitHub. You'll inspect the list of repositories in the account, the pull requests authored, and the assigned issues.
You're pretty far along into building this application, and yet, all the application does is tell you your login. You'd probably like a little bit more from a desktop GitHub client. Next, you'll add the capability to list repositories, pull requests, and assigned issues.
Query repositories, pull requests, and issues using GraphQL
To be able to display information from GitHub, you need to retrieve it. So, add the following GraphQL queries to the mix:
lib/src/github_gql/github_queries.graphql
query ViewerDetail {
  viewer {
    login
  }
}

// Add everything below here.

query PullRequests($count: Int!) {
  viewer {
    pullRequests(
      first: $count
      orderBy: { field: CREATED_AT, direction: DESC }
    ) {
      edges {
        node {
          repository {
            nameWithOwner
            url
          }
          author {
            login
            url
          }
          number
          url
          title
          updatedAt
          url
          state
          isDraft
          comments {
            totalCount
          }
          files {
            totalCount
          }
        }
      }
    }
  }
}

query AssignedIssues($query: String!, $count: Int!) {
  search(query: $query, type: ISSUE, first: $count) {
    edges {
      node {
        ... on Issue {
          __typename
          repository {
            nameWithOwner
            url
          }
          number
          url
          title
          author {
            login
            url
          }
          labels(last: 10) {
            nodes {
              name
              color
            }
          }
          comments {
            totalCount
          }
        }
      }
    }
  }
}

query Repositories($count: Int!) {
  viewer {
    repositories(
      first: $count
      orderBy: { field: UPDATED_AT, direction: DESC }
    ) {
      nodes {
        name
        description
        isFork
        isPrivate
        stargazers {
          totalCount
        }
        url
        issues {
          totalCount
        }
        owner {
          login
          avatarUrl
        }
      }
    }
  }
}
To re-generate your GraphQL client library, run the following command:
$ flutter pub run build_runner build --delete-conflicting-outputsAdd one last dependency
In rendering the data returned from the above queries, you'll use an additional package, fluttericon, for easily displaying GitHub's Octicons.
pubspec.yaml
name: github_graphql_client
description: Github client using Github API V4 (GraphQL)
publish_to: 'none' # Remove this line if you wish to publish to pub.dev
version: 1.0.0+1

environment:
  sdk: ^2.9.0-14.0.dev
  flutter: ^1.20.0-0.0.pre

dependencies:
  flutter:
    sdk: flutter
  fluttericon: ^1.0.7        # Add this dependency.
  gql: ^0.12.3
  gql_exec: ^0.2.4
  gql_link: ^0.3.0
  gql_http_link: ^0.2.9
  gql_transform_link: ^0.1.5
  http: ^0.12.1
  provider: ^4.0.4
  oauth2: ^1.6.1
  url_launcher: ^5.4.10
  window_to_front:
    path: '../window_to_front'

dev_dependencies:
  build_runner: ^1.10.0
  gql_build: ^0.0.11
  pedantic: ^1.9.0

flutter:
  uses-material-design: true
Widgets to render the results to screen
You are going to use the GraphQL queries you created above to populate a NavigationRail widget with views of your repositories, assigned issues, and pull requests. The Material.io design system documentation explains how Navigation rails provide ergonomic movement between primary destinations in applications.
Create a new file, and fill it with the following content.
lib/src/github_summary.dart
import 'package:flutter/material.dart';
import 'package:fluttericon/octicons_icons.dart';
import 'package:gql_exec/gql_exec.dart';
import 'package:gql_http_link/gql_http_link.dart';
import 'package:gql_link/gql_link.dart';
import 'package:http/http.dart' as http;
import 'package:url_launcher/url_launcher.dart';
import 'github_gql/github_queries.data.gql.dart';
import 'github_gql/github_queries.req.gql.dart';

class GitHubSummary extends StatefulWidget {
  GitHubSummary({@required http.Client client})
      : _link = HttpLink(
          'https://api.github.com/graphql',
          httpClient: client,
        );
  final HttpLink _link;
  @override
  _GitHubSummaryState createState() => _GitHubSummaryState();
}

class _GitHubSummaryState extends State<GitHubSummary> {
  int _selectedIndex = 0;

  @override
  Widget build(BuildContext context) {
    return Row(
      children: [
        NavigationRail(
          selectedIndex: _selectedIndex,
          onDestinationSelected: (int index) {
            setState(() {
              _selectedIndex = index;
            });
          },
          labelType: NavigationRailLabelType.selected,
          destinations: [
            NavigationRailDestination(
              icon: Icon(Octicons.repo),
              label: Text('Repositories'),
            ),
            NavigationRailDestination(
              icon: Icon(Octicons.issue_opened),
              label: Text('Assigned Issues'),
            ),
            NavigationRailDestination(
              icon: Icon(Octicons.git_pull_request),
              label: Text('Pull Requests'),
            ),
          ],
        ),
        VerticalDivider(thickness: 1, width: 1),
        // This is the main content.
        Expanded(
          child: IndexedStack(
            index: _selectedIndex,
            children: [
              RepositoriesList(link: widget._link),
              AssignedIssuesList(link: widget._link),
              PullRequestsList(link: widget._link),
            ],
          ),
        ),
      ],
    );
  }
}

class RepositoriesList extends StatefulWidget {
  const RepositoriesList({@required this.link});
  final Link link;
  @override
  _RepositoriesListState createState() => _RepositoriesListState(link: link);
}

class _RepositoriesListState extends State<RepositoriesList> {
  _RepositoriesListState({@required Link link}) {
    _repositories = _retreiveRespositories(link);
  }
  Future<List<$Repositories$viewer$repositories$nodes>> _repositories;

  Future<List<$Repositories$viewer$repositories$nodes>> _retreiveRespositories(
      Link link) async {
    var result = await link.request(Repositories((b) => b..count = 100)).first;
    if (result.errors != null && result.errors.isNotEmpty) {
      throw QueryException(result.errors);
    }
    return $Repositories(result.data).viewer.repositories.nodes;
  }

  @override
  Widget build(BuildContext context) {
    return FutureBuilder<List<$Repositories$viewer$repositories$nodes>>(
      future: _repositories,
      builder: (context, snapshot) {
        if (snapshot.hasError) {
          return Center(child: Text('${snapshot.error}'));
        }
        if (!snapshot.hasData) {
          return Center(child: CircularProgressIndicator());
        }
        var repositories = snapshot.data;
        return ListView.builder(
          itemBuilder: (context, index) {
            var repository = repositories[index];
            return ListTile(
              title: Text('${repository.owner.login}/${repository.name}'),
              subtitle: Text(repository.description ?? 'No description'),
              onTap: () => _launchUrl(context, repository.url.value),
            );
          },
          itemCount: repositories.length,
        );
      },
    );
  }
}

class AssignedIssuesList extends StatefulWidget {
  const AssignedIssuesList({@required this.link});
  final Link link;
  @override
  _AssignedIssuesListState createState() =>
      _AssignedIssuesListState(link: link);
}

class _AssignedIssuesListState extends State<AssignedIssuesList> {
  _AssignedIssuesListState({@required Link link}) {
    _assignedIssues = _retrieveAssignedIssues(link);
  }

  Future<List<$AssignedIssues$search$edges$node$asIssue>> _assignedIssues;

  Future<List<$AssignedIssues$search$edges$node$asIssue>>
      _retrieveAssignedIssues(Link link) async {
    var result = await link.request(ViewerDetail((b) => b)).first;
    if (result.errors != null && result.errors.isNotEmpty) {
      throw QueryException(result.errors);
    }
    var _viewer = $ViewerDetail(result.data).viewer;

    result = await link
        .request(AssignedIssues((b) => b
          ..count = 100
          ..query = 'is:open assignee:${_viewer.login} archived:false'))
        .first;
    if (result.errors != null && result.errors.isNotEmpty) {
      throw QueryException(result.errors);
    }
    return $AssignedIssues(result.data)
        .search
        .edges
        .map((e) => e.node)
        .whereType<$AssignedIssues$search$edges$node$asIssue>()
        .toList();
  }

  @override
  Widget build(BuildContext context) {
    return FutureBuilder<List<$AssignedIssues$search$edges$node$asIssue>>(
      future: _assignedIssues,
      builder: (context, snapshot) {
        if (snapshot.hasError) {
          return Center(child: Text('${snapshot.error}'));
        }
        if (!snapshot.hasData) {
          return Center(child: CircularProgressIndicator());
        }
        var assignedIssues = snapshot.data;
        return ListView.builder(
          itemBuilder: (context, index) {
            var assignedIssue = assignedIssues[index];
            return ListTile(
              title: Text('${assignedIssue.title}'),
              subtitle: Text('${assignedIssue.repository.nameWithOwner} '
                  'Issue #${assignedIssue.number} '
                  'opened by ${assignedIssue.author.login}'),
              onTap: () => _launchUrl(context, assignedIssue.url.value),
            );
          },
          itemCount: assignedIssues.length,
        );
      },
    );
  }
}

class PullRequestsList extends StatefulWidget {
  const PullRequestsList({@required this.link});
  final Link link;
  @override
  _PullRequestsListState createState() => _PullRequestsListState(link: link);
}

class _PullRequestsListState extends State<PullRequestsList> {
  _PullRequestsListState({@required Link link}) {
    _pullRequests = _retrievePullRequests(link);
  }
  Future<List<$PullRequests$viewer$pullRequests$edges$node>> _pullRequests;

  Future<List<$PullRequests$viewer$pullRequests$edges$node>>
      _retrievePullRequests(Link link) async {
    var result = await link.request(PullRequests((b) => b..count = 100)).first;
    if (result.errors != null && result.errors.isNotEmpty) {
      throw QueryException(result.errors);
    }
    return $PullRequests(result.data)
        .viewer
        .pullRequests
        .edges
        .map((e) => e.node)
        .toList();
  }

  @override
  Widget build(BuildContext context) {
    return FutureBuilder<List<$PullRequests$viewer$pullRequests$edges$node>>(
      future: _pullRequests,
      builder: (context, snapshot) {
        if (snapshot.hasError) {
          return Center(child: Text('${snapshot.error}'));
        }
        if (!snapshot.hasData) {
          return Center(child: CircularProgressIndicator());
        }
        var pullRequests = snapshot.data;
        return ListView.builder(
          itemBuilder: (context, index) {
            var pullRequest = pullRequests[index];
            return ListTile(
              title: Text('${pullRequest.title}'),
              subtitle: Text('${pullRequest.repository.nameWithOwner} '
                  'PR #${pullRequest.number} '
                  'opened by ${pullRequest.author.login} '
                  '(${pullRequest.state.value.toLowerCase()})'),
              onTap: () => _launchUrl(context, pullRequest.url.value),
            );
          },
          itemCount: pullRequests.length,
        );
      },
    );
  }
}

class QueryException implements Exception {
  QueryException(this.errors);
  List<GraphQLError> errors;
  @override
  String toString() {
    return 'Query Exception: ${errors.map((err) => '$err').join(',')}';
  }
}

Future<void> _launchUrl(BuildContext context, String url) async {
  if (await canLaunch(url)) {
    await launch(url);
  } else {
    return showDialog(
      context: context,
      builder: (context) => AlertDialog(
        title: Text('Navigation error'),
        content: Text('Could not launch $url'),
        actions: <Widget>[
          FlatButton(
            child: Text('Close'),
            onPressed: () {
              Navigator.of(context).pop();
            },
          ),
        ],
      ),
    );
  }
}
You have added a lot of new code here. The upside is that this is all pretty normal Flutter code, with widgets used to separate out responsibility for different concerns. Spend a few moments reviewing this code before moving onto the next step of making it all run.
Put it all together, one last time
It's time to integrate GitHubSummary into your lib/main.dart file. The changes are fairly major this time, but consist mostly of deletions. Replace the contents of your lib/main.dart file with the following.
lib/main.dart
import 'package:flutter/material.dart';
import 'package:window_to_front/window_to_front.dart';
import 'github_oauth_credentials.dart';
import 'src/github_login.dart';
import 'src/github_summary.dart';
void main() {
runApp(MyApp());
}
class MyApp extends StatelessWidget {
@override
Widget build(BuildContext context) {
return MaterialApp(
title: 'GitHub GraphQL API Client',
theme: ThemeData(
primarySwatch: Colors.blue,
visualDensity: VisualDensity.adaptivePlatformDensity,
),
home: MyHomePage(title: 'GitHub GraphQL API Client'),
);
}
}
class MyHomePage extends StatelessWidget {
MyHomePage({Key key, this.title}) : super(key: key);
final String title;
@override
Widget build(BuildContext context) {
return GithubLoginWidget(
builder: (context, client) {
WindowToFront.activate();
return Scaffold(
appBar: AppBar(
title: Text(title),
),
body: GitHubSummary(client: client),
);
},
githubClientId: githubClientId,
githubClientSecret: githubClientSecret,
githubScopes: githubScopes,
);
}
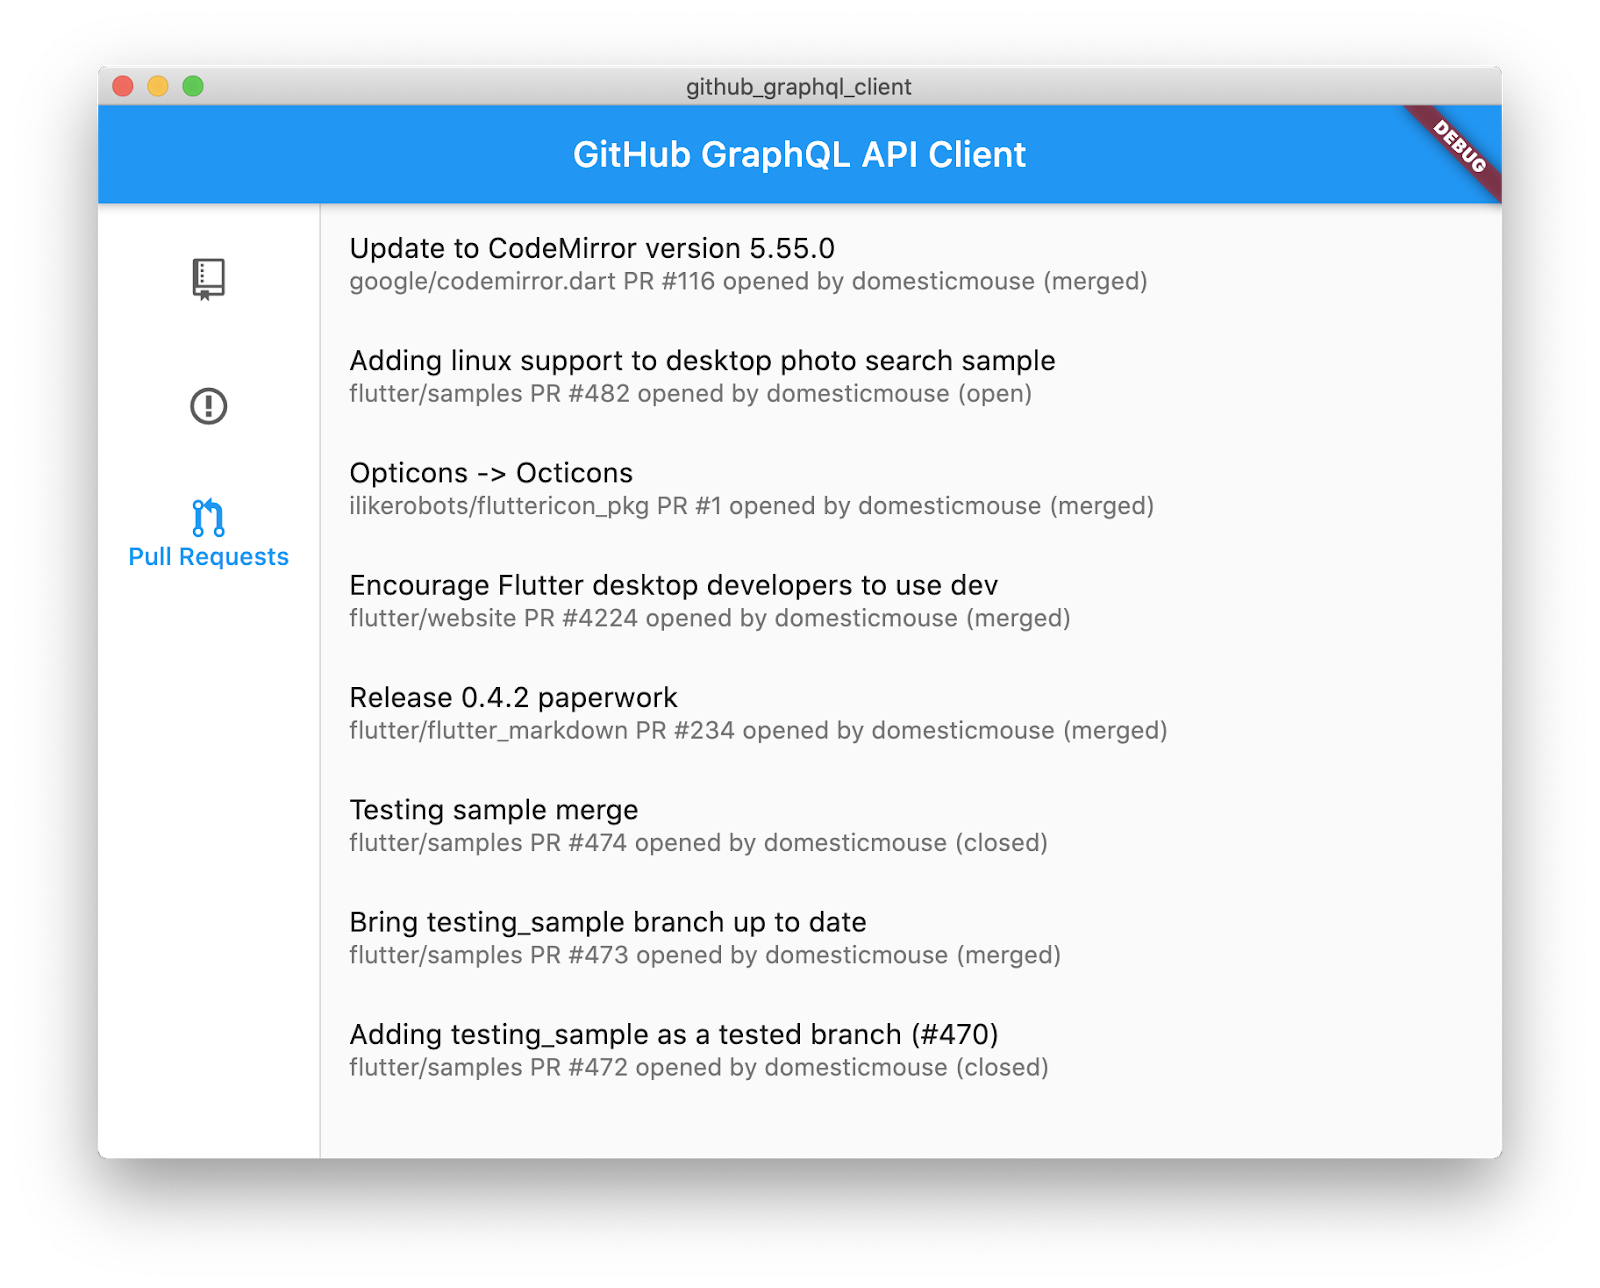
}Run the application, and you should be greeted with something like this:
Or, alternatively:
Congratulations!
You've completed the codelab and built a desktop Flutter application that accesses GitHub's GraphQL API. You used an authenticated API using OAuth, you generated a type-safe client library, and you used native APIs via a plugin that you also created.
To learn more about Flutter on desktop, visit flutter.dev/desktop. To learn more about GraphQL, visit graphql.org/learn. Finally, to see a totally different take on Flutter and GitHub, see GroovinChip's GitHub-Activity-Feed.